Pages

Showing posts with label best practices. Show all posts

Sunday, March 18, 2018

Guest Post: Choosing and Using a Crochet Word of the Year with Kathryn Vercillo

Kathryn Vercillo of Crochet Concupiscence is a crochet maven I've known for several years. I really appreciate her, and I've especially appreciated her encouragement and advice. Her passion comes through in everything she does. I'm honored to share this guest post, written by Kathryn. In it, she shares some unique advice for framing your crochet around a "word of the year." All text and photos below belong to Kathryn. Enjoy!

Choosing and Using a Crochet “Word of the Year”
By Kathryn Vercillo

Some people choose a “word of the year” at the start of each new year to set an intention for the year. It is a terrific practice for giving focus to your life in the months ahead. Although it’s helpful to begin at the new year, choosing a word to work with is something that you can begin at any time of the year. Believe it or not, crochet can be a key part of working with your word for personal growth and development. In this post, you’ll learn a five-step process for choosing and using a word in crochet. Note that this presumes that you already know how to crochet – at least the basic crochet stitches – but that you don’t have to have any advanced crochet skills for this exercise.  

Step One: Choosing a Word

There are many different approaches to choosing your word for the year. Personally, I do a lot of mulling over and journaling but also just let my mind wander and see what sticks. The word has to excite me enough that I think I'll want to commit a year to its use in my life, and I know in my gut immediately whether or not a word does that. That said, it's not at all unusual for me to select a word only to discover a week or two later that it's not the right word because there's a better one. For example, I thought for sure that my 2018 year was going to be "hope" but then later realized that instead I'm going to investigate (dis)comfort (technically two words, I know). If the right word comes at any time, stay open to recalibrating.

The word you choose does not have to be a lofty, abstract ideal or virtue. We often feel like we must choose such words (hope, gratitude, change, peace, discipline). And that's fine, but sometimes such words can be too limiting, too intangible, too hard to live up to. It's perfectly wonderful to choose a more common word, a noun (butterfly, shell, home) or a place (Hawaii, Iceland) or a word inspired by craft itself (which we'll explore more below). You can take the choosing of your word very seriously but you don't have to; this is meant to make your life better and easier and more fun, providing a little structure for your own growth but not in arms rigid, painful, stressful way.

How does this relate to crochet? First, you may use meditative crochet to help you find your word of the year. That downtime in crafting, the time when your hands are stitching away and colors flowing into shapes, is great for bringing a keyword to the surface. For a more active connection to crochet, you could brainstorm a list of words that you think of related to crochet and to choose your word from this list. You might include words that are specific to the craft (stitch, treble, rows, yarn) and you might include words that the craft makes you think of (cozy, inspired, relaxed, skillful).

Here is a list of words from the world of crochet that you might want to pull from in selecting your word of the year: Loop, hook, craft, granny, chain, single, double, treble, ripple, chevron, motif, doily, vintage, handmade, frog, skein, hank, hands, insert, pull through, popcorn, cluster, bullion, bobble, picot, edging, finish, weave, ends, join, cable, color, creativity, self-expression, arrange, lay flat, shell, Tunisian, basketweave, lace, stitch, row, round, gauge, freeform, art, decor, garment, toy, pattern, symbol, abbreviation, graph, increase, decrease, work in progress


Step Two: Investigating the Word

Once you have a word, spend a few weeks or months really digging into that word. Get curious about it in every way that you can and explore those curiosities. Of course, you'll probably do some version of this throughout the year but it’s especially important to immerse yourself in it early on. During this time, I look up the definition of the word and its synonyms and find books with the word in its title or subject and ask others what they think of when they hear this word. I try to generate even more interest in the word within myself than I had as the year began by getting to really know this word.

During your deep dive into the word, take some time to research the relationship of the word to crochet. Some Googling will get you started - pair your word with "crochet" or "yarn" or "craft" or "hobbies" to get inspired ideas about how your word might relate to crochet out there in the world. Ask crocheters that you know what the word makes them think of, particularly in regards to the craft. This year, I'll look at how crochet makes people comfortable / uncomfortable. Last year I learned about immersion dyeing of yarn and thought about the possibility of immersing myself in a crochet retreat. If you can't find strong links between your word and crochet, try synonyms of your word as well as tangents that your word makes you think about.

Step Three: Going Inside

In the process of learning all about the word, I certainly do a lot of thinking about what the word means to me personally. The next step is to dig even deeper into this. How do I relate to the word? What has come up emotionally or tangibly as I've investigated this word? I journal more during this time, pondering it more, working with it more as it relates directly to my own experience. In 2017, my word was “immerse”. I thought that maybe during this time I would immerse myself in one of those sensory deprivation tanks; I didn't do that, but I did think about why I would or wouldn't do that. It's good to have goals for this project and you still benefit when you don't meet all of them.

Let’s bring this back to crochet. Again, you can use meditative crochet to dig deeper into the word’s meaning for you. You can work with affirmations in crochet, repeating the same mantra after each round, to reflect upon the word. Sometimes coming up with the affirmation is easy ("I immerse myself in the joy of crochet") but even when it's less obvious, it can be done ("My crochet is like a butterfly, powerful in its transformation.")

Crochet can also be a way to lighten your exploration of the word and make it easier and more fun to work with. In journaling, you can only do so much with the word itself. Sometimes it feels too heavy and serious and frankly just confusing to ask yourself repeatedly, "what do I think about immersion today?" (or "when should I choose discomfort over comfort"). But you can tie the word with crochet and the investigation becomes a little simpler ... What do I feel about immersing myself in crochet? What are the benefits of doing so? It's easier to grasp onto this tangible thing and to work with it in small bites, through a yarn language that I understand. Pair your word with “crochet” and see where it takes you.


Step Four: Reaching Outside

Next, I try to turn the study of the word from inwards to outwards, and more specifically to how I can use this word to connect with others. In what ways does this word relate to my community, to my work, to my relationships, to the art I share? I didn't end up doing a whole lot with "immerse" in the third quarter of 2017, but one goal I had in mind was that when I went on a very special trip to my mom's hometown with her and my siblings, I would not take any work or other distractions and would fully immerse myself in being there with them. Doing so was invaluable.

Crochet can be a way to connect us with other people. We can gift our crochet, donate it to charity, crochet simply with the intention of another's benefit in mind. We can crochet to calm ourselves down and make ourselves happier with the secondary goal of improving our relationships with others, increasing our patience and kindness towards the world around us. We can crochet in ways that connect us to the people around us. These techniques can be combined with your word in creative ways as you think about how to use both to reach out to your community.

Find ways to relate your crochet to the word while linking it with your values. If I care about the environment, I learn about what yarn dye immersion is and how my choices around the purchasing of that fiber do and don't impact the environment. Or I think about how I can "immerse" myself in my crochet community. Or I immerse myself in a crochet project for a specific person. If your word is "butterfly", how does fiber processing impact their environment? Or what can we learn from the ways butterflies migrate to inform our own travels to other parts? Get creative, make links in your mind between the word, the craft and what matters most to you in relation to others outside of yourself.

When sharing your crochet, as gifts or online or in art shows, add labels and captions and messages that incorporate your word. Ask yourself how your crochet and this word can strengthen your connections and act upon that.

Step Five: Reflection

I don't like to put too much pressure on the word's power or importance. I like it to be a guiding point throughout the year but I don't ever want it to feel like an obligation. After researching and looking in and out, I have a good sense of the word, and I like to take time to just kind of relax with it and reflect upon it. Sometimes new things come up or I try things that I had thought of earlier in the year but didn't explore. Sometimes it's just a period of rest and rejuvenation and not paying too much attention to the word, letting it relax into the background while waiting for a new word to emerge to start the process over again.

We need time to rest with our word, and crochet is such a great way to rest. As your hands work with yarn, the loops come together into a fabric ... and the different stories and situations from throughout the year come together in a narrative in the mind. Crochet is the jumping off point for exploring our word and the tool that gives us space to reflect upon it.


This has been a guest post by Kathryn Vercillo, blogger at Crochet Concupiscence and author of several books, including Crochet Saved My Life and Mandalas for Marinke. You can support her work with micro-donations through Patreon.

Friday, February 12, 2016

Tips for Managing Miserable Crochet Tasks

Crochet: It ain't all sunshine and roses. Like any hobby, crochet has its not-so-fun bits. Instrumentalists have to empty their spit valves, carpenters have to sweep up their shops, and paper crafters have to tend to their paper cuts. There are likely a few crochet tasks that you're not too fond of. Here are a few of mine along with tips to trick yourself into dealing with them in a timely manner. You may even be able to avoid them altogether!

Tip #1: Crochet over your ends.
Whenever possible, I crochet over my ends by laying them along my working row of stitches. So long as you work over at least six inches of tail you should be golden. No ends to weave in!
Tip #2: Don't save them all for last.
Weave in an end here and there, perhaps every time you put the project away for the day. That way you will slowly work through them over time.
Tip #3: Tough love.
So, you've waited too long and now all you have left to complete of your project is weaving in a million ends. Well, guess who isn't allowed to start a new project until they are woven in? You, that's who!

Tip #1: Avoid the base chain altogether by starting with foundation stitches. 
Check out tutorials for foundation single crochet, half double crochet, and double crochet. These will change your life fo sho.
Tip #2: Take mini-breaks. 
Do a little dance and pat yourself on the back every 20 stitches or so to keep yourself enthused.
Tip #3: Pick a decadent yarn.
If you're able, pick a yarn that is simply delightful to work with for this project. That way crocheting into the chain won't feel like a chore.


Tip #1: Don't save up a big pile o' blocking.
Block each project right after it is finished, don't wait until you have several to complete at a time.
Tip #2: Splurge on nice blocking materials.
$50 to $60 up front can cure a lifetime of the blocking blues. With nicer mats, wool wash, pins, and wires you will be able to block more efficiently and come away with a more polished finished product.
Tip #3: Steam block it instead.
Too darned impatient to wait overnight? Get instant gratification by hovering your iron over your dry, pinned project and steaming the heck out of it. *BOOM* Dry in 10 minutes.

Tip #1: Avoid the join by joining as you go.
There are many methods for joining as you go that will circumvent the dreaded joining of a million motifs. Edie Eckman has a great class on Craftsy that includes this and other skills.
Tip #2: Crochet your joins instead of sewing them. 
If you don't mind a slightly raised texture, slip stitches and single crochet are much quicker and less labor intensive than whip stitch or mattress stitch.
Tip #3: Knock it out.
Instead of dragging the task out, find several uninterrupted hours and join everything all at once. Painful in the short term, but it may save you weeks of dreading joining.

Tip #1: Cry.
I'm kidding...kind of. Seriously, tangled yarn can be super frustrating. It's okay to let out a sigh or even a colorful word to acknowledge that.
Tip #2: Be gentle and patient.
Now that your frustration is out of the way, treat the yarn delicately. Lightly shake it to loosen it up instead of pulling. Pulling and tugging only makes it worse.
Tip #3: Outsource it.
You just can't even? Well, there's a group out there who would love to help you out.

Tip #1: Go look at project pages on Ravelry.
Remind yourself of your reasons for choosing this project by appreciating others' finished versions. Get inspired again!
Tip #2: Work up a quick instant gratification project.
It might be that you miss the feeling of completion and pride that you get when you finish a project. Make something small that can be finished quickly to get those hooks moving again.
Tip #3: Be honest with yourself.
Some projects may not be for you. It's okay to appreciate that thread-weight tablecloth pattern without working it up yourself. Try to select projects that you will maintain enthusiasm for. It may take a while to figure out what you're really into.

Tuesday, January 19, 2016

How to Write a (Good) Indie Crochet Pattern

Have you ever wanted to write your own crochet pattern? There are so many folks out there with creative ideas that they want to share with others. The internet has made it possible for an idea to be shared faster than ever and to many people at once. However, there are responsibilities that come with this rapid transmission of information, if only to oneself. How will people perceive you based on your work? A typo might not mean that much when texting with a friend, but in a pattern it could really frustrate the people you are trying to share your ideas with. Trust me, I've learned the hard way :) No one is perfect and there is always a learning curve, but today I'd love to share my pattern writing tips with you. I hope that they help you to avoid some of the mistakes I've made and give you confidence as you create.

Here are some basic steps to take when writing an indie crochet pattern for self-publishing. Note that this is not a tutorial on how to get your patterns published in books and magazines. I am in the process of doing that right now, so I'll let you know after I'm done if I have any tips for you :) As a side note, please note that every designer is different. These tips are based on what has worked well for me.

You've got an idea. That's great! An idea is special, but don't let it become your "baby". You will likely need to change it in some way. If you get too attached to the very first thing you come up with, it's going to be difficult for you to make your pattern the best that it can be. Ask yourself hard questions... Has this idea been done before? If so, how is your version different/better? Is this a pattern someone will be able to figure out by looking at the picture? Does that matter to you? The most successful pattern will be one that is difficult for others to replicate without your unique instructions. It will also be something that is desirable to a specific group of people, your target audience. If you're not interested in getting paid for the pattern this is less of a concern (and I hope you have a good reason not to get paid for hours of hard work). In all cases you will want to refine your idea to the best of your ability. Don't be afraid to frog, both in real life and in your brain.

Now that your idea has been polished, you are likely chomping at the bit to get started. Hold up! First you need to figure out how your pattern will be presented. Will you be posting to a blog? Keep in mind that large image files may load slowly for some readers, potentially driving them away. Will you be uploading a PDF to Ravelry or another site? You will want to create a template for your crochet pattern, making sure to include all of the necessary information. Will this be passed out as a leaflet? Perhaps the quality of the paper matters. As soon as you start analyzing your medium of choice you will likely come up with a specific set of things to consider while formatting the pattern.

Here's one last thing to think about before you get your hook moving. Crochet patterns come in all kinds of styles. There are written patterns, photo tutorials, charts, diagrams, and video tutorials. You may be including only one of or a combination of these. Decide now what type of instructions best suit your pattern so that you can gather the necessary information as you go along. It's hard to include a photo tutorial of that special stitch if the item is complete and you forgot to take any photos. Make future you happy and save them some unnecessary work. Also, think of your audience. Something that seems easy to you may not be easy to them. You can help them out by including the same information in multiple styles so that hopefully one of them clicks.

That's right, you can totally get hooking now! As you do, remember to record everything you are doing. Seriously. No, you will not "just remember" that you chose to count the turning chain as a stitch for one part of the pattern and not another. It's much safer and easier to record everything as you go along rather than trying to recount a bunch of stitches while spreading things out and wondering where exactly the slip stitch went. Remember, this is like the scientific method. You need to keep track of every variable and process so that someone else can precisely replicate your result. As you become more adept at pattern writing there will be exceptions to this rule. I could probably write a simple beanie in my head without even making it (but I wouldn't!). As you start out you'll want to be strict with yourself. It doesn't matter if you record digitally or on paper. I happen to like paper because it feels better to me to write things down by hand... and I also have a pretty rainbow notebook.

Along with recording the process comes recording everything else as well. Everything. Else. Keep track of your yarn label because you'll want to share a lot of the information on it. Record what hook you are using in case the project and hook get separated. This is especially important if you have multiple styles of the same hook size. If it is a larger project, record how many skeins you started with. Eventually you'll also want to weigh your yarn to determine how much you used based on how much is left. This will require some math. Did you use any buttons or findings? You may want to keep track of where you purchased them. As you can see, there are many details to track.

This step is non-negotiable. Once your pattern has been completed and prepared you will be tempted to post it right away. After all, you spent all of that time focusing on details, right? I'm here to tell you that there is no substitution for field-testing your pattern. Pattern testers provide fresh eyes and perspective. They will let you know if part of the pattern confuses them, if the pictures aren't clear enough, if they can't find the type of yarn you used, or if they can't match your gauge. Your pattern will hopefully be worked up by many hobby crocheters, so it only makes sense to gather the thoughts and opinions of hobby crocheters. Additionally, editing should be a part of this process. Someone other than you needs to make sure all of the stitch counts are correct and that the wording is consistent. There are technical editors out there that you can pay for this service if desired. Use the comments of the people above to drive thoughtful revision and editing of your pattern.

Make sure to get some inviting photos of the finished object, both for advertising and to include in the pattern. It's okay to send a simpler photo of the item to your testers. However, you will eventually want some shots that have flair. You don't need a fancy camera to achieve this. In fact, I take almost all of my product pictures with my iPhone! The main thing to think about is lighting. Indirect, natural light works best for me. Also, go ahead and edit the photos a little if you need to. Don't change the color too much or misrepresent the item, but some cropping and a tweak of the sharpness settings can take a photo to new and better places. You've put in a lot of work here, make sure the finished item shines!

This is it! What began as an idea is now a realized pattern. It's time to share your work with the world. This is the most satisfying part of the process for me. There's nothing quite like seeing your pattern up on Ravelry or getting blog hits. When people post project pages it gets even better! Of course, by this point the next idea is probably simmering pretty noisily on that back burner in your mind :)

Have any questions? Did you think of something I missed? Let me know in the comments.

Friday, August 21, 2015

UK and US Crochet Terms

Did you know that the crochet terms used in the UK are different from those used in the US? If you've ever tried using a pattern from one and the terms from the other, you may have noticed that your project did not come out right. Need some help with term conversion? Here's a chart of common terms for you. There are many charts like this out there, but this one is mine <3


Wednesday, March 25, 2015

Is it Ever Okay to Tie Knots in Crochet?


Okay, so I'm going to admit something to you. I have a pet peeve... I can't stand it when I'm asked to tie knots while working on a crochet project. Different folks have different ideas about when it is or is not a good idea to tie knots in your yarn, but my opinion is that it should be avoided if at all possible. Why avoid tying knots? They just aren't as stable and lasting as they look.

Consider shoelaces. How may times have you worn a pair of shoes only to have them continually come untied throughout the day? Ditto for pajama pant cinches, sweatshirt hood pulls, and bathing suit ties. The knots seem so secure when you've just tugged on them, but they inevitably wiggle undone. The same principal applies in crochet. It may seem like your tied yarn ends will never come apart, but they will, especially if the item is going to end up going through the wash. Whether you're changing colors or adding a new skein to your project, don't just tie a knot. Take the time to do a Russian join or a proper color change on the last step of your last stitch with the old color. Then crochet over or weave in your ends appropriately. If you're not sure how to do something, remember you can always search online for tutorials. There are lots of people out there who can help!

If you really feel that you must tie a knot, here are a few occasions where the consequences will be less disastrous:

- You are crocheting an amigurumi and the knots will be on the inside of the animal

- You are making some kind of decorative item that will not be touched often, like an ornament or garland

- You are employing the cut-and-tie method of color changing to make a complex tapestry crochet wall hanging

Here's one final note on knots. If you're going to tie one, alternate which end you lead with. So if you start your first knot with the right strand over the left strand, start your second reinforcer-knot by putting the left strand over the right. That will make a tighter and more stable set of knots than simply tying with the same end leading over and over.

How do you feel about tying knots in crochet?

Monday, March 23, 2015

Beyond the Hook: Essential Crochet Tools

A crochet enthusiast could likely spend all day looking at pretty yarns and become all twitterpated. However, it's important to come back down to earth once in a while and be practical. Today I'd like to go over what's in my tool kit as an avid and professional crocheter.


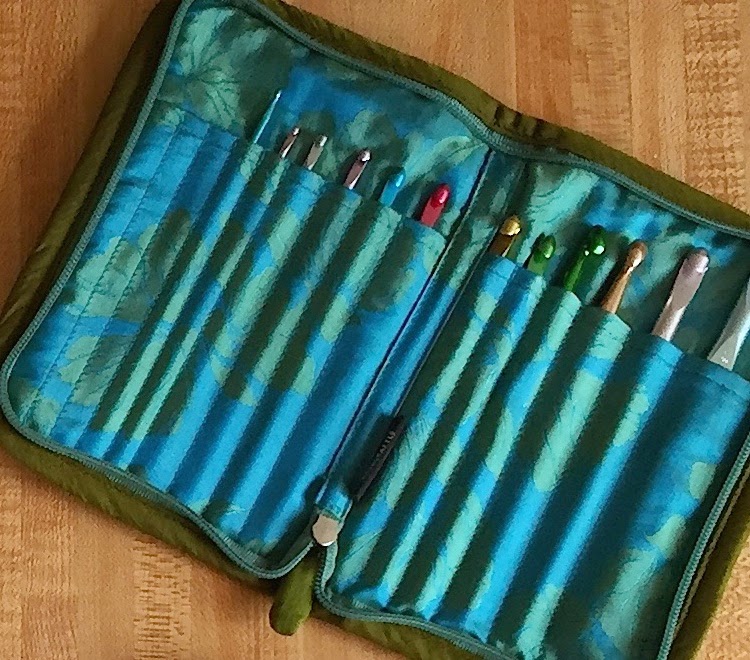
The first item is a hook case. I have a few that I switch between because there are just too many cute hook cases out there! This blue and green case was given to me by my sorority sister, Suzanne. A case keeps your hooks organized and clean. It also protects special hooks from getting scratched or otherwise damaged.


Next up we have some measuring tools. I use the tape measure for measuring finished objects. It's also useful for measuring things that aren't flat, like the inside of a hat brim or someone's head. I use both the ruler and the sheep as gauge checkers. They help ensure that I my projects will be sized as intended.


Every crocheter needs a good, sharp pair of scissors. Try your very best not to use your yarn scissors on anything but yarn. This will help them to stay sharp and free from contaminants that could get on your projects.


A yarn needle, or preferably a set of yarn needles in different sizes, is essential for weaving in ends and adding embellishments to your projects. Some people like the style with a bend at the tip. I prefer classic yarn needles. You can help yourself keep track of your yarn needles by keeping them in your hook case.


Here's my little tomato of pins. I am a very knotty crocheter indeed... I use pins with colored heads. Ideally you should use pins with flat heads or no color. Why? In addition to being used to keep things in place while sewing crochet pieces together or for sewing on appliques, pins are used in blocking. Blocking entails using water (and often heat as well). If you use heat and water with colored pins the color could come off on your project. So in this case... do as I say and not as I do :p


If you can swing it, it's a good idea to have a decent camera for taking pictures of your crochet items. After all, items are often given away as gifts and you'll want to keep a little piece of your hard work with you! Cameras are also good for taking pictures that end up on Ravelry or social media. It's not necessary to have a giant SLR fancy shmancy camera (though how cool if you do!). A simple camera or even a smartphone camera will do.


A pen is a simple but essential crochet tool. You may want to cross off rows as you complete them if you've printed your pattern. You may want to make notes on a yarn label. Make sure you have a pen nearby. A small notebook is a good idea, too. I have several notebooks and notepads that serve different functions in my designing.

Do you want to start a new project with a partial skein of yarn but you have no idea how much yarn is left? A small kitchen scale can help you figure it out. Make sure you get one that lists ounces. You can get your yardage from the ounces by doing a conversion according to the information on the label. Just plug and chug with x / yardage of the full skein = oz you have left / oz in the full skein. I also use my scale to figure out how many yards are required for one of my patterns.


Here's my beloved yarn winder and swift. If you're buying yarn in hanks, which is how most non-craft yarn is sold, you'll save time spent in the store or time spent at home hand-winding yarn if you invest in a set like this. Winding yarn is so satisfying.


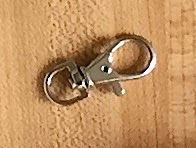
Finally, we have stitch markers. These can help you keep count as well as hold your spot at the end of continuous rounds. Make sure  they are removable. I'm a little odd when it comes to stitch markers. I actually like to use these giant lobster clasps. Then I can even attach a little note to them if I want to help myself remember something!


Other desirable tools that aren't pictured include a blocking board, a row counter, and compression gloves (if you have any pain when you crochet).

Can you think of any tools I may have missed?

Wednesday, February 11, 2015

How to Fasten Off Your Crochet

The scenario: You've finished crocheting the most awesome scarf ever for your bestie. She's going to love it! However, you have one problem... How do you detach the end of your working yarn from your scarf without the scarf unraveling? By fastening off, that's how! Here's how to fasten off at the end of a crochet piece.

Here I am at the end of my final row and ready to fasten off. 

I cut the yarn, separating the leftover yarn from my work, making sure to leave a six to eight inch tail.

I make a chain stitch, just as if I were starting a new row.

However, instead of turning and crocheting I remove the hook and continue to pull up on the yarn loop created by the chain stitch. I pull until the tail comes all of the way through.

Finally, I pull tightly on the tail to create a tight nub. Now I'm ready to weave in my end.

That's all there is to it! Now that you know how to fasten off you can rest easy and trust that your crochet will not unravel.

Monday, February 9, 2015

Helpful Crochet Hints

Have you ever read Heloise's Helpful Hints in the newspaper? I just love them. I sometimes ask myself how I never knew such simple things that could have been making my life easier all along. In an effort to pay it forward I'm going to share with you (in no particular order) a few helpful crochet tips that could potentially make your life a bit easier. 


- When making a garment in a washable yarn, make sure to wash a small swatch in the yarn you're using. That way you'll know if there's going to be any shrinkage and you can crochet the right sized garment accordingly. 

- Use a magnet to keep track of your metal findings (thanks, Brenda!). 

- Don't wind your yarn skeins until you're ready to use them. Winding them too early and letting them sit in cakes isn't good for the elasticity of the yarn and may warp it a bit.

- Did you accidentally work up too many chain stitches for your base chain? No need to redo your chain and first row. Carefully untie your slip knot, pull out the extra chain stitches, and very securely weave in the end.

- When learning a new stitch or technique, try to use a yarn that is lighter in color so you can see your stitches better. 

- Did you run out of the yarn you're using and can't find more at the store? Look up the yarn and colorway on Ravelry and see if anyone has some listed in their stash. They may be willing to sell it to you. 

- If you need to work in spiral rounds and you don't have a stitch marker, good stitch marker substitutes include a piece of yarn in a contrasting color, an earring, a clasp, or a twist tie.

Have any more tips of your own to share?

Wednesday, January 28, 2015

Crocheting for Cats: Important Things to Remember

Do you have a little crochet buddy? A ball of fur who keeps you company as you work? If so, you'll probably be tempted at some point to crochet them something of their very own. Here are some tips to help you out as you make a gift for kitty.


- Never leave cats unattended to play with balls of yarn. If they decide to eat it the yarn could cause problems in their intestines. Instead, supervise play and then put the yarn ball out of reach until next time.

- When making toy mice or other toys that have strings hanging, reinforce the tails and tassels so they aren't easily chewed off and swallowed.

- As with babies, eyes on stuffed animals made for cats should either be safety eyes or sewn on. Never use small beads or buttons on a project for cats.

- If you can possibly do so, choose washable materials for cat toys.

- Avoid very lacy items for cats as their paws/claws may become tangled or stuck in the holes. 

- Cats love textures so choose an interesting stitch pattern.

- There is some research to suggest that cats prefer cool colors such as green, blue, and purple, so choosing those colors of yarn for your project might please kitty.

- If you're making a stuffed item for your cat you may wish to lace the stuffing with catnip.

Have you crocheted something for your cat that they enjoyed? Let us know about it in the comments.

Monday, December 15, 2014

Learn to Crochet Lesson One: How to Tie a Slip Knot

There are a lot of folks out there who are getting into crochet for the first time. Bravo! It's a wonderfully relaxing, creative, and rewarding hobby. I'd like to help encourage those who are new to crochet by providing a series of short lessons intended for complete novices. Today's post is the first in that series, a lesson on slip knots.

A slip knot is used to anchor your yarn to your hook so that you can start crocheting. Crochet is a series of interlocking loops, so you have to have a loop to start with before you can make anything. Here is how to tie a slip knot. When learning something new it's best to work with a light color of yarn. I've chosen Martha Stewart Extra Soft Wool Blend and a 5.5mm hook for this tutorial. I also recommend Lion Brand Vanna's Choice and a 6mm hook for novice crocheters.

Find the end of your yarn. You can pull from the outside of the skein or from the inside of the skein if your yarn is center-pull. Read the label to find out.

Cross the tail of your yarn over the rest of the strand. We will call the part of the strand that connects to the skein the 'working yarn'.

Put your index finger and thumb under the loop and get ready to grab the working yarn.

Grab and pull the working yarn through the loop.

Pinch the working yarn that you just pulled through. Tighten the slip knot by pulling on the tail with your other hand.

You now have a loop that can slide over your hook. Tighten the loop by pulling on the working yarn strand.

Insert your hook into the loop and tighten it until the loop is slightly snug on the hook. 

Congratulations! You have successfully made a slip knot and can now begin to crochet. Have any questions about this tutorial? Feel free to ask them in the comments.

Wednesday, November 26, 2014

What is WPI and Why is it So Awesome?

Water Polo Iguanas? Wonderful Pie Initiative? Wishing Penny Inscription? What exactly does WPI mean? You may have seen that acronym on a yarn label recently, along with a number. Here's the deal: WPI stands for Wraps Per Inch. Wraps per inch? What does that mean? Well my friends, as it turns out it means a lot when it comes to comparing yarns and achieving proper gauge in your crochet projects. Are you ready for a little lesson on WPI? Allow me to blow your mind and change the way you look at yarn.

WPI is an essential piece of information when it comes to yarn substitution. Say you want to crochet a hat that calls for 200 yards of a particular worsted weight yarn, Vanna's Choice. You don't have any Vanna's in your stash right now but you do have 200 yards of Cascade 220, a different worsted weight yarn. You can just use the Cascade instead, right? I mean, they're both worsted weight... Unfortunately, the answer is "not necessarily". Just like two differently-branded hooks of the same size won't necessarily make the same sized stitches, two yarns of the same weight aren't necessarily the same. Take a look at the yarns in question. They are both worsted weight and yet they are not the same thickness.

 
What?! I know. It's terrible and frustrating. However, WPI is here to save the day. It's the great equalizer. Here's how to find the WPI of any yarn. Take a ruler and gently wrap the yarn around and around it. Push the yarn strands together into an inch and count how many strands there are. That's all there is to it! Here's Berroco Comfort Worsted. It has a WPI of 9.


The higher the WPI the thinner the yarn because more yarn strands can fit into an inch. In order to get an accurate measurement be sure you aren't yanking on your yarn and wrapping it too tightly as seen below.


So, according to WPI measurements, if I wanted to use Berroco Comfort in place of Cascade 220 I wouldn't encounter a problem. However, if I wanted to use Berroco Comfort or Cascade 220 in place of Vanna's Choice I might have some issues since the former is actually thinner than the latter, even though they are labeled with the same weight. This issue becomes even more pronounced the larger the yarn. I cannot emphasize enough how important it is to check the WPI of a yarn that is labeled bulky or super bulky if you plan on subbing in something else. Some bulky yarns are closer to worsted in thickness!

Are you a little nervous about obtaining an accurate WPI measurement for your yarn by yourself with your ruler? You're in luck! Ravelry has got you covered and almost always lists the WPI of yarns in its yarn database.


As a final note, it's just fine to sub in a yarn that doesn't have the same WPI as the original yarn. Just be aware that you may now have to change your hook size in order to obtain the same gauge and finished item size as the designer's sample.

So there you have it! WPI measurements can save you a lot of trouble when using one yarn in place of another, especially when the finished size of the item really matters. Have questions about WPI? Ask away in the comments!

Friday, November 21, 2014

How to Weave In Yarn Ends

If you want your crochet piece to have a long, full life it is important to weave in your yarn ends securely. Improperly woven in ends can come loose or even start to unravel. No one wants to see their hard work wasted and their beautiful item destroyed! Don't be shy or nervous if you're unsure of how to properly weave in yarn ends. Here's everything you need to know. You will need a yarn needle and a pair of scissors in addition to your crocheted piece.

When finishing your crochet piece, make sure not to cut the tail too short. A short tail will make weaving in very difficult.

Never simply cut your yarn tail off after finishing a piece. No matter how much or how tightly you knot it there's a good chance that it will eventually come undone and start to unravel.

Leave a tail that is about eight to twelve inches long so it will be easy to weave in. Thread your yarn needle. Yarn needles can be found in most common craft and yarn stores. 

Insert your needle inside a row of stitches on the back side, or wrong side, of the item. The more detailed your stitch pattern is the more creative you'll have to be with where to put your needle. You can also run the needle through the inside of stitches vertically if necessary.

As a general rule, carry the tail through at least three to six inches of stitches.

Pull the tail through evenly, not so tightly that you distort your stitches.

Now it's time to go back the other direction through the same set of stitches. However, make sure to skip over a loop, indicated by the blue arrow. Skipping over a loop will ensure that the first pass of the yarn remains in place.

Here's another view of me weaving my end back through the same set of stitches.

Here you can see that my tail has been woven in and is now sticking out from the same location as it was when I began.

At this point it's okay to trim the remaining end off with a scissors.

There you have it! My yarn tail has been woven in. The tail may poke out a tiny bit after washing or a lot of use, but it can be carefully trimmed again in that case.

Weaving in ends is a simple but important skill for creating successful and polished crochet projects, yet it's not addressed as often in books and other learn-to-crochet texts as you would think. Do you have any questions about weaving in ends? Feel free to ask them in the comments!