Pages

Monday, March 30, 2015

What is Ply?

You've probably heard people talk about "ply" in relation to yarn and crocheting. What is ply exactly and what information does it give us about a yarn? I'm going to answer those questions for you today.

Ply is the number of smaller strands that are twisted together to make one strand of yarn. Yarn can be more loosely or more tightly plied, giving a different look to the yarn and to the overall project. Oftentimes the higher the ply the thicker the yarn. However, don't assume that yarn ply and yarn weight are the same thing. For example, worsted weight yarns can be 4, 8, or even 10 ply. Let's look at some pictures to help us wrap our minds around ply.

This super bulky yarn has one ply. Only one strand of fiber is twisted. The twist of the fiber is the only thing that separates one ply yarn from roving.

This sport weight yarn is two-ply. See the two smaller strands that make up the larger single strand of the yarn? Also notice that is it much more slender than the previous yarn even though it has another ply.

Here is a four-ply worsted weight yarn.

Here's another worsted weight yarn, but this one is eight-ply. Notice the difference in the texture of the yarn compared to the other worsted example.

I hope that ply is no longer a mystery to you. Try playing around with differently plied yarns to see what you like to crochet with the most!

Friday, March 27, 2015

From the Source Friday: Joe's Camels


The fourth Friday of every month is From the Source Friday! Show your appreciation to these dedicated fiber farmers as they teach you all about where your yarn comes from. Today we are going to learn all about camels. Did you know that yarn can be made from camel fiber? You may have heard of the luxuriousness of camel hair coats. Just imagine how fun it would be to crochet with camel yarn! Joe of Joe's camels is here to tell us all about his animals.


Life on the farm...
We have a herd of 5 female and 1 male Bactrian Camels.  Camels have cattle nomenclature, so we have 5 cows and one bull, with a few calves due this spring.  There are two main types of Camels.  There is the one-humped Dromedary Camel from the Middle East, North Africa and India, with feral populations in Australia.  We, however raise the 2-humped Bactrian Camel from China and Mongolia.  There is a true wild Bactrian Camel and it is one of the most endangered large animals on the planet.  Domestic Bactrians far outnumber Dromedaries globally, as well as in North America.  There are supposedly only a few hundred Bactrian Camels in North America, versus a few thousand of their single-humped cousins.  The two types of animals can cross breed, with the offspring being large in stature and having a very large hump. 

They're pretty easy keepers and the management of Bactrian Camels is awfully similar to cattle.  They are easy on our electric fences, but are very susceptible to parasites.  Coming from a dry environment, their systems haven't been used to the parasites our livestock often carry.  Parasite control is the most important components of a camel management plan. 

The benefit of Bactrian Camels is their enormous fleeces, which luckily shed off in the spring.  No, there is no need to sheer our animals, thankfully it simply sheds off in the spring time.  We brush it out and they will often line up to get brushed.  I liken it to wallpaper removal, as it will often hang in big clumps off of our animals.  We often find the hair in clumps in the field.  It has been stated that one Bactrian Camel can produce as much as 30 pounds of fur, and it is so much hair that their fleeces will literally hang to the ground in the winter time.  The under hair of the animal is the desired product of the fleece and the guard hair is the least desirable.  We have our fiber processed and de-haired at Zeilinger Wool Mill in Frankenmuth, Mich. 


A Camel Story
Calving time can and has been much more time-consuming and even emotional.  My wife (Marcia) and I were in Europe last spring and we had a calf born.  The calf had a rough start at life and was also born all white.  White Bactrian Camels are extremely rare.  This calf's mother was not raised on our farm and isn't the most friendly of animals and she calved out in the field a snow white little bull calf, we named Olaf.  He was too weak to stand but he had a strong will to live and was definitely hungry.  My folks, who daily manage our animals, worked around the clock to ensure Olaf pulled through.  He was still too weak to stand after the first day and was taken to Michigan State University Vet. Clinic.  He spent a few days at the Clinic and received blood transfusions from another one of our camels and made a great turnaround.  The work of my folks and the MSU Vet. Clinic saved Olaf's life.  He definitely looked forward to his around the clock bottles and even loved to kick a soccer ball.  Olaf was placed in a loving home near Philadelphia.

We have names for all of our camels including; Emma, Gracie, Barbie, Camella, Bonnie, and Eugene.  Bonnie and Gracie are the stars of the barn and one can't come into the barn without saying hello to those two.  They love ginger snaps and Gracie is trained to kiss you for a treat.

Have a look!


So cool! Wanna see more camel pics? Check out their website. Joe's Camels also posts a "hump day" picture on their Facebook page every Wednesday. How cute is that?? Camel fiber and roving is available on Etsy. Thanks for sharing with us today, Joe!

Wednesday, March 25, 2015

Is it Ever Okay to Tie Knots in Crochet?


Okay, so I'm going to admit something to you. I have a pet peeve... I can't stand it when I'm asked to tie knots while working on a crochet project. Different folks have different ideas about when it is or is not a good idea to tie knots in your yarn, but my opinion is that it should be avoided if at all possible. Why avoid tying knots? They just aren't as stable and lasting as they look.

Consider shoelaces. How may times have you worn a pair of shoes only to have them continually come untied throughout the day? Ditto for pajama pant cinches, sweatshirt hood pulls, and bathing suit ties. The knots seem so secure when you've just tugged on them, but they inevitably wiggle undone. The same principal applies in crochet. It may seem like your tied yarn ends will never come apart, but they will, especially if the item is going to end up going through the wash. Whether you're changing colors or adding a new skein to your project, don't just tie a knot. Take the time to do a Russian join or a proper color change on the last step of your last stitch with the old color. Then crochet over or weave in your ends appropriately. If you're not sure how to do something, remember you can always search online for tutorials. There are lots of people out there who can help!

If you really feel that you must tie a knot, here are a few occasions where the consequences will be less disastrous:

- You are crocheting an amigurumi and the knots will be on the inside of the animal

- You are making some kind of decorative item that will not be touched often, like an ornament or garland

- You are employing the cut-and-tie method of color changing to make a complex tapestry crochet wall hanging

Here's one final note on knots. If you're going to tie one, alternate which end you lead with. So if you start your first knot with the right strand over the left strand, start your second reinforcer-knot by putting the left strand over the right. That will make a tighter and more stable set of knots than simply tying with the same end leading over and over.

How do you feel about tying knots in crochet?

Monday, March 23, 2015

Beyond the Hook: Essential Crochet Tools

A crochet enthusiast could likely spend all day looking at pretty yarns and become all twitterpated. However, it's important to come back down to earth once in a while and be practical. Today I'd like to go over what's in my tool kit as an avid and professional crocheter.


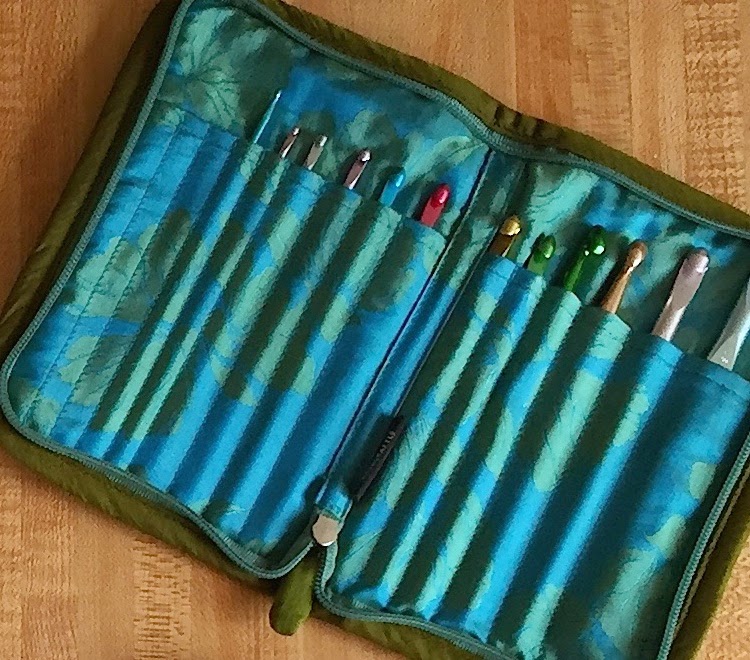
The first item is a hook case. I have a few that I switch between because there are just too many cute hook cases out there! This blue and green case was given to me by my sorority sister, Suzanne. A case keeps your hooks organized and clean. It also protects special hooks from getting scratched or otherwise damaged.


Next up we have some measuring tools. I use the tape measure for measuring finished objects. It's also useful for measuring things that aren't flat, like the inside of a hat brim or someone's head. I use both the ruler and the sheep as gauge checkers. They help ensure that I my projects will be sized as intended.


Every crocheter needs a good, sharp pair of scissors. Try your very best not to use your yarn scissors on anything but yarn. This will help them to stay sharp and free from contaminants that could get on your projects.


A yarn needle, or preferably a set of yarn needles in different sizes, is essential for weaving in ends and adding embellishments to your projects. Some people like the style with a bend at the tip. I prefer classic yarn needles. You can help yourself keep track of your yarn needles by keeping them in your hook case.


Here's my little tomato of pins. I am a very knotty crocheter indeed... I use pins with colored heads. Ideally you should use pins with flat heads or no color. Why? In addition to being used to keep things in place while sewing crochet pieces together or for sewing on appliques, pins are used in blocking. Blocking entails using water (and often heat as well). If you use heat and water with colored pins the color could come off on your project. So in this case... do as I say and not as I do :p


If you can swing it, it's a good idea to have a decent camera for taking pictures of your crochet items. After all, items are often given away as gifts and you'll want to keep a little piece of your hard work with you! Cameras are also good for taking pictures that end up on Ravelry or social media. It's not necessary to have a giant SLR fancy shmancy camera (though how cool if you do!). A simple camera or even a smartphone camera will do.


A pen is a simple but essential crochet tool. You may want to cross off rows as you complete them if you've printed your pattern. You may want to make notes on a yarn label. Make sure you have a pen nearby. A small notebook is a good idea, too. I have several notebooks and notepads that serve different functions in my designing.

Do you want to start a new project with a partial skein of yarn but you have no idea how much yarn is left? A small kitchen scale can help you figure it out. Make sure you get one that lists ounces. You can get your yardage from the ounces by doing a conversion according to the information on the label. Just plug and chug with x / yardage of the full skein = oz you have left / oz in the full skein. I also use my scale to figure out how many yards are required for one of my patterns.


Here's my beloved yarn winder and swift. If you're buying yarn in hanks, which is how most non-craft yarn is sold, you'll save time spent in the store or time spent at home hand-winding yarn if you invest in a set like this. Winding yarn is so satisfying.


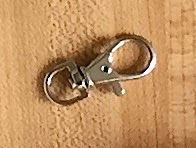
Finally, we have stitch markers. These can help you keep count as well as hold your spot at the end of continuous rounds. Make sure  they are removable. I'm a little odd when it comes to stitch markers. I actually like to use these giant lobster clasps. Then I can even attach a little note to them if I want to help myself remember something!


Other desirable tools that aren't pictured include a blocking board, a row counter, and compression gloves (if you have any pain when you crochet).

Can you think of any tools I may have missed?

Friday, March 20, 2015

Reach Out Friday: Operation Smile


The third Friday of every month is Reach Out Friday! Learn about ways that you can use crochet to help others through special charities and groups. Today's featured charity is Operation Smile.


Overview 
About 1 in every 700 children is born with a cleft lip or cleft palate, making it a relatively common birth defect. A cleft is a split in the lip and/or the palate. This is very visually recognizable and can be very stigmatizing for those affected. Other ramifications of the condition include difficulties in speech and in nutrition. The wonderful thing is that cleft lip/palate is relatively easy to fix through surgery, especially if it is fixed early in life. In first world countries the condition is fixed as a matter of course. However, in areas where there is widespread poverty and/or lack of modern medical care, individuals affected by this birth defect do not receive and any treatment and are left to deal with it on their own. That's where Operation Smile comes in. Read their mission statement below to see how this wonderfully group is improving the lives of children around the world.

As a crocheter, you can help! It's true. You don't have to be a medical professional to make a difference in the lives of these children. Among many other ways to get involved, Operation Smile accepts handmade blankets which they give to the children in the hospital. These blankets are a source of comfort in a scary yet life-changing moment. You can find more information on blanket donation here.

Mission Statement
"The goal of every medical mission and all our surgical programs is to heal children's smiles and transform lives across the globe.

Our unique and successful medical mission model is providing safe surgeries for children around the world while building a long-term sustainable solution.

We mobilize medical volunteers across the globe to treat children with cleft lip, cleft palate and other facial deformities, and leave a legacy of trained medical professionals, surgical equipment and professional partnerships to expand local medical infrastructures and create self-reliance in low and middle income countries."

Special Considerations
Please note that the blanket info page suggests specific sizes and materials for blanket making.

Reach Out
Are you ready to help? After taking a look at this link you can go ahead and start planning your blanket! Fill it with good thoughts as you crochet. When the blanket is ready to be sent to a child in need you can print out and fill out an accompanying blanket form. The complete package is to be sent to:

Operation Smile
Attn: WAREHOUSE/Service Project
3641 Faculty Boulevard
Virginia Beach, VA 23453 USA

Wednesday, March 18, 2015

National Crochet Month and Crochet Learning Styles

Happy National Crochet Month! Welcome to the 18th day of Crochetville's annual NatCroMo blog tour. In the spirit of National Crochet month and the blog tour, please consider supporting Halos of Hope by donating or by making crochet hats for cancer patients.


If you're visiting Illuminate Crochet for the first time today, welcome! I hope you'll make yourself comfortable. I've got crochet tutorials, unique patterns, community connections, and some funny stuff here to educate and entertain you. Read to the end of the post to find an exclusive coupon code for NatCroMo readers.

Today we are going to explore learning styles. What are learning styles? It is theorized that there are four main styles of learning -- visual, auditory, kinesthetic, and tactile. In other words, learning by looking, learning by listening, learning by doing, and learning by touching. Knowing which style or combination of styles is best for you can help you to achieve and reach your highest potential both in crochet and in other pursuits.

Are you ready to find out what kind of learner you are and how you can improve your crochet skills? Take this quiz! While this quiz is based on real educational concepts, the results are for entertainment purposes.

I hope you enjoy taking the quiz as much as I enjoyed creating it! I also hope that you're equipped with a few new tools for tackling new crochet patterns, techniques, and stitches. As a thank you for reading today and in celebration of National Crochet Month, please accept this coupon code: yo!natcromo. What does the code get you? A FREE download of my Mermaid Cowl pattern on Ravelry. Simply add the pattern to your cart and then enter the code at checkout. Act fast! This code is only good until midnight on Wednesday, March 25th.


Happy hooking!

Monday, March 16, 2015

Four Ways to Start a Crochet Circle

Something that's awesome about crochet is how easy it is to work in the round. Hats, motifs, amigurumi, and much more can all easily be started as a circle. Did you know there are several different ways to start a crochet circle? I'm sure there are more, since crochet is so flexible and ever-expanding, but today I'm going to teach you four ways to start a crochet circle so you can work in the round.

Number One: The Chain 2 Method

Start by chaining 2.

Skip the first stitch (the one closest to the hook) and work your first round into the second stitch.

Number Two: The Chain 4 Method

Start by chaining 4.

Slip stitch into the last chain stitch (the first chain stitch you created) to form a ring. Now you're ready to create a turning chain of the appropriate height and then work your first round into the center of the chain ring.

Here you can see my hook inserted through the middle of the ring.

Here you can see my first round underway. The hole left in the center of this circle will be larger than if you used the chain 2 method, which could be either desirable or undesirable depending on the project.

Number Three: The Magic Circle Method

This is my very favorite method of starting a circle. I have a full, in-depth tutorial available here. The hole left using this method is barely noticeable at all.

Number Four: The Formed Ring Method

Did you know that you can crochet onto any ring? You can! Metal, plastic, wood -- they're all fair game. Just slip stitch right onto the ring and crochet away. If you need a crochet circle with a wide center and a lot of strength, consider using a preformed ring.

Friday, March 13, 2015

Indie Dye Friday: Dye-It-Yourself


The second Friday of every month is Indie-Dye Friday! Feast your eyes on lovely yarn in gorgeous colorways developed by talented independent yarn dyers.

Today's featured dyer is... you! Hey now, I can see that quizzical look on your brow. You may be thinking, "how can I possibly be an indie dyer?" Well, these days dyeing yarn is a lot more accessible than you might think. Knit Picks has a whole line of bare fibers for you to experiment with, and you can often find bare yarns in your local yarn store as well.

You also have several options when it comes to dyes. There are all kinds of kits and books out there to help you dye your own yarn. There are also yarn dyeing tutorials made available online.

So, full disclosure, I've never dyed my own yarn. It's true! I'm hoping that this post will inspire not only you folks but me as well. Let's all get out there and dye our very own hank of yarn. Think of how unique our projects will be! Have you ever dyed your own yarn? Tell us all about it in the comments.


Wednesday, March 11, 2015

Crochet Cat Round-up

I love cats! I'm sure that's obvious by now. I talk about little Ranna way too often :p However, I'm not alone. There are so many cat-lovers out there in crochet land. I thought I'd give us all a treat today with a quick round-up of some of my favorite cat-related crochet patterns. Meow let's get started! All photos are used with the permission of the designers.


Aren't they all so freaking cute? What are your favorite cat crochet patterns?

Monday, March 9, 2015

Remembering Why I Crochet

Life can be very stressful sometimes. During the past several months I have had a lot of change and turmoil in mine. It's that ebb and flow, an ocean of passing days. Sometimes everything seems to be going your way. You're wading through happiness as it swirls and foams around you. Other times -- like what I'm experiencing right now -- things don't fit together as easily and you're stepping lightly across sharp stones, looking for the shiny bits.

As a result of the changes I'm going through, for the past few months I haven't had much time for my design business. All of my ideas have been simmering away on the back burner. My stress would lead me to neglect my crochet, which would stress me out, which would lead me to neglect my crochet... you can see where this is going. Things like keeping the clothes and dishes clean and staying awake until bedtime have become victories of sorts.

A little over a week ago I finally had a breakthrough. I looked at my forlorn project, the design I'd most recently started, and I knew I needed to spend some time with it. I ended up finishing it a few days later. The quiet, calming process of crocheting coupled with that familiar exhilaration of completing a design really lifted my spirits. Instead of making my life more hectic, making time for my crochet had the opposite effect. I felt more ready to complete other tasks and more prepared to take on each day. My new pattern is now out being tested and I couldn't be happier about it. It's a great shiny moment to hold onto in a turbulent time.

Why do I crochet? It's not just my business or even my hobby. It's my way of staying connected -- to myself, to the shiny bits, and to a community of fiber friends. Readers, I hope you're making time for crochet. Let's all take a moment to remember why we love it so very much.


Friday, March 6, 2015

Fiber Arts Friday: Tatting with Marilee Rockley


The first Friday of every month is Fiber Arts Friday! Join me as we expand our horizons beyond crochet to focus on other interesting fiber and needle arts. Enjoy the beautiful projects and learn something new along the way. Today we are indeed in for a treat! Master tatter Marilee Rockley is here to tell us all about tatting. What is tatting? "Tatting is a technique for handcrafting a particularly durable lace constructed by a series of knots and loops." Ready to learn something new? Take it away, Marilee!

About Marilee
Hello, my name is Marilee Rockley. I live in the exciting, culturally diverse area of Milwaukee, Wisconsin, with my husband and 3 sons. Over the years I've experimented with many fiber arts, but tatting remains my favorite. I discovered tatting as a girl when I found a small needlework how-to book stashed among my mother’s art books. Between those sketchy instructions, library books, and trial and error, I soon taught myself and fell in love with the art.

I especially enjoy designing tatted jewelry combining colors, beads, thread, and pattern. I also dye some of my own thread to achieve unique colors.

How long have you been tatting? How did you get started?
I’ve been tatting over 30 years, and designing and selling tatted jewelry since 2004. Magazine articles featuring my tatted jewelry have appeared in Bead&Button (April 2012) and Belle Armoire Jewelry (Winter 2015). I am the author of the book Tatted Jewelry published 2011 by Annie’s Attic, as well as 3 self-published books: Up and Tat ‘Em (2010), Boutique Tatting (2008), and Marilee's Beaded Tatting Finery (2014).

What advice do you have for folks who are interested in tatting?
I teach an online video Shuttle Tatting course on Craftsy and video is a great way for people to learn how to tat. The basic "double stitch" of tatting is actually a knot most people are familiar with as a "Lark's Head" knot. The tricky part in tatting is that although the thread that the shuttle is carrying does the movements to form the knot, the knot itself must be transferred or "flipped" to the other thread that's wrapped over the other hand. This takes some practice to develop a muscle memory in your hands before it becomes easy and automatic. I compare it to learning to ride a bicycle without training wheels! But, once you've "got it" about the basic double stitch, it's easy to move on to more complex designs.


Here is some of Marilee's work...


For more information, check out my blog and follow my page on Facebook. I sell my patterns, hand dyed thread, and finished items on Etsy.

Absolutely gorgeous work, don't you think? What a cool hobby. If you're interested in learning more about tatting, here's a nifty website you can visit. Thank you so very much for sharing your expertise and your pretties with us today, Marilee!