Pages

Showing posts with label tools. Show all posts

Tuesday, November 10, 2015

knitPro

I know I've been on a tool kick lately, but I have one more that I'd like to share with you. knitPro is a cool graphing program for colorwork that lets you upload your own photos and turn them into a graph pattern. To give you an example of how well it works, I uploaded this picture that I took in college:


Here's the resulting graph on the "Regular" size setting:

Not too shabby! Let's try another.


Here's the graph.
Good attention to detail in this program! This is definitely a program I would recommend if you wanted to do highly detailed colorwork. Why not try it out? I think the biggest challenge would be selecting the colors necessary for the design. What do you think?

Tuesday, October 13, 2015

Yarn Substitution with Yarnsub

Pattern writing is a detailed process. It's important that I record everything I'm doing, as perfectly as possible, so that others know just what to do when following the pattern. However, I can't control for everything. Yarn substitution is one of those things that it's hard for me to control for. I can list the weight of the yarn I used, the brand, the color, the gauge with the hook that the pattern calls for... but if a different yarn is used all bets are off. Yarns of the same weight vary enough in thickness and other qualities that two hats made exactly the same way but in different yarns could be very different from one another.

So, what's the solution? I've written about WPI before, and knowing about that helps a lot. However, there is another tool available for this purpose. Have you heard of Yarnsub? It is a really awesome web tool for helping you find yarns that are similar to the yarn called for by the pattern you're following. How does it work? Let me show you!

Let's say my pattern calls for Cascade Yarns Cherub Aran (which I love). What if that yarn isn't readily available in your area and you'd like to start working on your project today? Perhaps you'd like to see if something in your existing stash will work. Well, let's plug it into Yarnsub and find some options.


Yarnsub gives me all of the specs for the yarn in question. How handy! Keep in mind that the gauge listed is for knitting. Not to worry! It also provides suggestions.


Right away you get recommendations for similar yarns on a number of different points, including gauge, fiber content, and even notes about the qualities of the finished project.


So many options! Seriously, I love this tool. It can also help you find less or more expensive yarn options, as well as help you to learn about new yarns and yarn in general. Try it out!

Friday, September 18, 2015

Creating Crochet Charts in Stitch Fiddle

Have you heard of Stitch Fiddle? It's a free new stitch charting tool from the Netherlands that serves knitters, embroiderers/cross stitchers, and crocheters! You can use it to make traditional stitch charts, filet charts, and color charts. It seems really versatile. I played around with it a bit recently and have decided that, for me, it is probably most useful for its ability to make color charts. You can even set the gauge for your chart, as well as the dimensions. Here are a few screenshots of my experimentation. Be sure to try it out for yourself, and thanks to Toni for introducing me to it!


Monday, March 23, 2015

Beyond the Hook: Essential Crochet Tools

A crochet enthusiast could likely spend all day looking at pretty yarns and become all twitterpated. However, it's important to come back down to earth once in a while and be practical. Today I'd like to go over what's in my tool kit as an avid and professional crocheter.


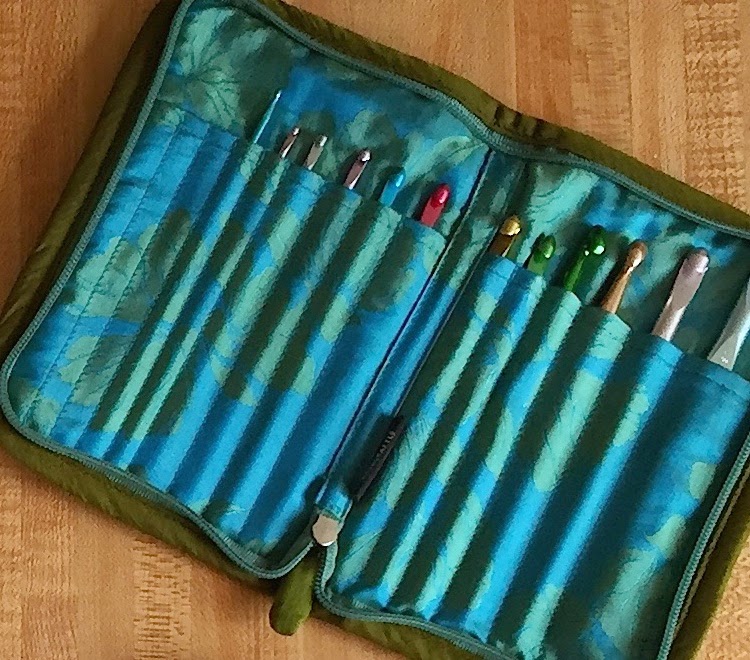
The first item is a hook case. I have a few that I switch between because there are just too many cute hook cases out there! This blue and green case was given to me by my sorority sister, Suzanne. A case keeps your hooks organized and clean. It also protects special hooks from getting scratched or otherwise damaged.


Next up we have some measuring tools. I use the tape measure for measuring finished objects. It's also useful for measuring things that aren't flat, like the inside of a hat brim or someone's head. I use both the ruler and the sheep as gauge checkers. They help ensure that I my projects will be sized as intended.


Every crocheter needs a good, sharp pair of scissors. Try your very best not to use your yarn scissors on anything but yarn. This will help them to stay sharp and free from contaminants that could get on your projects.


A yarn needle, or preferably a set of yarn needles in different sizes, is essential for weaving in ends and adding embellishments to your projects. Some people like the style with a bend at the tip. I prefer classic yarn needles. You can help yourself keep track of your yarn needles by keeping them in your hook case.


Here's my little tomato of pins. I am a very knotty crocheter indeed... I use pins with colored heads. Ideally you should use pins with flat heads or no color. Why? In addition to being used to keep things in place while sewing crochet pieces together or for sewing on appliques, pins are used in blocking. Blocking entails using water (and often heat as well). If you use heat and water with colored pins the color could come off on your project. So in this case... do as I say and not as I do :p


If you can swing it, it's a good idea to have a decent camera for taking pictures of your crochet items. After all, items are often given away as gifts and you'll want to keep a little piece of your hard work with you! Cameras are also good for taking pictures that end up on Ravelry or social media. It's not necessary to have a giant SLR fancy shmancy camera (though how cool if you do!). A simple camera or even a smartphone camera will do.


A pen is a simple but essential crochet tool. You may want to cross off rows as you complete them if you've printed your pattern. You may want to make notes on a yarn label. Make sure you have a pen nearby. A small notebook is a good idea, too. I have several notebooks and notepads that serve different functions in my designing.

Do you want to start a new project with a partial skein of yarn but you have no idea how much yarn is left? A small kitchen scale can help you figure it out. Make sure you get one that lists ounces. You can get your yardage from the ounces by doing a conversion according to the information on the label. Just plug and chug with x / yardage of the full skein = oz you have left / oz in the full skein. I also use my scale to figure out how many yards are required for one of my patterns.


Here's my beloved yarn winder and swift. If you're buying yarn in hanks, which is how most non-craft yarn is sold, you'll save time spent in the store or time spent at home hand-winding yarn if you invest in a set like this. Winding yarn is so satisfying.


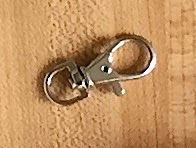
Finally, we have stitch markers. These can help you keep count as well as hold your spot at the end of continuous rounds. Make sure  they are removable. I'm a little odd when it comes to stitch markers. I actually like to use these giant lobster clasps. Then I can even attach a little note to them if I want to help myself remember something!


Other desirable tools that aren't pictured include a blocking board, a row counter, and compression gloves (if you have any pain when you crochet).

Can you think of any tools I may have missed?

Wednesday, January 29, 2014

Yarn Winder Heaven

I've been totally blissed out over my new yarn winder ever since I received it from my husband for Christmas. It's sturdy and quiet and amazing. I got the Stanwood Needlecraft large winder with a metal base as well as the corresponding swift. They are both well worth it and I wouldn't hesitate to recommend them to a fellow yarnie looking for a winder. WIND ALL THE THINGS!


Our cat got a bit too close to it while I was winding and it smacked her in the face, so now she's in a fight with it. She gives it dirty looks whenever I pull it out. No matter, it just means I get my sweet yarn cakes all to myself. Muahaha!

Monday, January 20, 2014

Stitchboard


There aren't many free tools for creating crochet patterns. There are several paid pattern making programs, but none that I've seen effectively deal with detailed color charts for tapestry crochet. Enter Stitchboard. Stitchboard's pattern wizard can help you take a picture of your choice and turn it into a stitch chart. This makes it an excellent tool for those who want to make custom designs. It's nice of the creators to make it available for free, and even more features are available to you if you make an account. The settings and options are decent and the program makes filet and tunisian crochet charts as well.

Though I am certainly thankful that this tool is available, it has a few shortcomings that I wish to discuss. The most annoying part of using the pattern wizard is that it does not allow you set the height of the chart and only allows a width up to 150 stitches. This can become a problem when you want to add a border to your finished project that requires a specific number of stitches. For example, a shell border requires a multiple of 6 stitches plus 1. Since you can't control how many rows the chart has, you may have to add random rows to the top and bottom to meet your border requirements.

The chart that Stitchboard comes up with is more of a starting place than a complete pattern. This becomes more pronounced the more complex the picture you start with is. Here's an example. When I started with this stock photo of a heart:


and gave a width of 100 stitches, the program spat out this chart:


Not bad at all! Very useful. There seem to be three colors instead of the two in the original picture, but it doesn't matter that much. However, when I used this picture:


and gave a width of 100 stitches, this is the chart that I got:


Hm. Pretty good, but needs some editing. There are brown stitches around the pupils even though the original pupils were all black. The nose isn't symmetrical. Perhaps you need to set an odd stitch width if you want to achieve symmetry. There are brown patches around the body and whites of the eyes that need to be cleaned up. Also, the colors of the spots and the rest of the body are too close, making it difficult to look at. As you can see, the chart is a good starting place but you'd have to go in with an image editor to clean it up which is a time-consuming and somewhat difficult process.

Just for fun, let's see what happens if we upload an actual picture into Stitchboard. We'll use the 100 stitch width again. Here's the picture, a flower from a greenhouse we visited in Hawaii:


and here's the result:


Better than I expected! But that's a lot of colors to work with. Perhaps I should have limited the color options quite a bit more.

I hope this review of Stitchboard proves useful to you, if only to make you aware of a tool you may not have been familiar with. I'm going to continue to use it until a better tool becomes available.

Monday, December 2, 2013

Kat Goldin and the Super Awesome Life-Saving Crochet Hat Chart

You needed to make a hat for your cousin Joe Shmoe for the holidays. You found the perfect pattern. You bought the perfect yarn. You selected the proper hook. You put a few hours of work into it...

...only to find that it was too small.

Okay, maybe you made a mistake or something, so you frogged the hat and re-made it. It was still too small. Um, what? You knew you followed the pattern exactly that time. You checked the yarn and the hook. The smiling hat-wearing man in the example picture was starting to make you angry. Maybe you tried the hat one last time before burning the pattern and yarn in a revenge fire and getting your cousin a pet rock instead, vowing never to make a hat again.


What gives? Well, there are several reasons that a hat can turn out too small, too large, too long, or not long enough. First, it's possible that there's an error in the pattern. A quick check of the pattern's rating, example pictures, and reviews can help you figure out if that's the case. Everything seems in order? Check your yarn. Some yarns, especially nicer ones, are not necessarily labeled with crocheters in mind. It might say it is between 4mm and 5mm, but it's closer to one or the other and using the wrong hook will make a significant difference in the item size. You might crochet more tightly or more loosely than the designer and the difference in your tension is affecting the item size. It may even be something as simple as the designer preferring a different brand of hooks. Even though you'd think a metric label would indicate standardization, two 6mm hooks from two different brands can make different sized stitches. I know, right? What kind of nightmare are we living in?

Here's the bottom line... your gauge is off. Most of the problems above are problems with gauge. No, don't run away! Please don't shut down when you hear the word "gauge". It may be easy to ignore gauge in the short term, but in the long term you will be a better crocheter if you take the time to understand it. Remember learning geometry in school? All gauge means is length times width. If a pattern says "5 rows by 5 stitches = 2 inches by 2 inches of single crochet" it means that, using the yarn and hook called for by the project, if you single crochet a square that is 5 stitches across and 5 rows tall it should measure 2 inches on each side. This is what's called a gauge swatch. If your swatch is smaller you are crocheting too tightly for the pattern and need to loosen up. If your swatch is larger you are crocheting too loosely and need to increase tension. You can also try sizing your hook up or down and checking the gauge again.

OR...

...you can be a renegade with me and go off the grid off the pattern. Hate trying to change your tension or hook to meet the gauge? The chart I'm about to link you to was created by Kat Goldin for Slugs on the Refrigerator. Go read part one of her amazing tutorial and then come back for a chat. Back? Great! So, her explanation has a lot of interesting and useful information in it. Part two has even more. For our purposes today the only thing you really need to pay attention to is the chart of standard hat measurements. Look at the column marked "Flat Circle Diameter". That is your holy grail of hat awesomeness. Say you pull the charred remains of Joe Shmoe's hat pattern out of the fireplace and have another go at it. Work the pattern and notice as you go 1) the stitch pattern and 2) where you stop increasing. Consider the following hypothetical pattern:

Start with magic circle.
Round 1: Work 6 dc into ring. Sl st in first st to join. (6)
Round 2: Ch 3. Work 2 dc in each st around. Sl st in first to to join. (12)
Round 3: Ch 3. Work 1 dc in first st and 2 dc in next. Rep around. Sl st in first st to join. (18)
Round 4: Ch 3. Work 1 dc each in first 2 sts and 2 dc in next. Rep around Sl st in first st to join. (24)
Round 5: Ch 3. Work 1 dc each in first 3 sts and 2 dc in next. Rep around. Sl st in first st to join.  (30)
Round 6: Ch 3. Work 1 dc in each st around. Sl st in first st to join. (30)

The stitch pattern here is simple double crochet. To find where you stop increasing, I want you to look at the counts at the end of the rows. Notice how they go up by 6 each time? That's because you are increasing at a regular rate. You started with 6 stitches in the first round and now you are adding 6 stitches to each subsequent round. This results in a flat circle. But wait, the stitch counts for rounds 5 and 6 are the same! That means that round 5 is the last round of increases. After that you're just adding to the height of the hat.

It's time to break out your tape measure. According to Kat's chart, the diameter of your circle at the end of round 5 should be very close to 6.75 inches since you are making a hat for a man. If the circle diameter is greater than that your hat will be too big. If the circle diameter is smaller than that your hat will be too small. Here's how to fix this without changing gauge: frog a round if the circle is too big or add a round using a regular increase if the circle is too small. Do this until your circle comes as close as possible to the required diameter. It's that easy! Then finish the rest of the pattern. Note that your stitch counts at the ends of rounds will now be different, but as long as you are following the style of the pattern you'll be just fine doing this with simple hats. You can even check your hat height against her chart too! She deserves a medal.

Let me know if there's anything in this post you need help with. I realize it's a bit long. With some know-how and a little luck you can now tackle any hat pattern without fear (or fire).

Monday, September 23, 2013

Design Seeds

A bad color combination can totally kill an otherwise awesome crochet project. I cringe when I see a finished object that was obviously made with love and skill but is hideous because it is chartreuse, neon pink, and burnt orange all together. Or electric blue with variegated camo-print and crimson.

Likewise, an awesome color combination can really make your hard work shine. If you need extra help picking out colors, read on. I'd like to introduce you to an awesome palette tool: Design Seeds. This website has page after page of delightful color combinations to inspire you and assist you with your next project, crochet or otherwise. You can even search for a particular color using the palette search feature. Here are a few palettes that I find pleasing. Please note that all palettes were created by Design Seeds. Links are provided.


You'll notice that matching any number of colors within the same palette creates a desirable combination. I love that many of the arrangements on the site are inspired by nature, the original color combiner. These palettes inspired me so much that I tooled around a bit and created my own from a picture I took. What do you think? I'll call it "dahlia design". Not as good as the professional palettes, but I had fun!


What are your favorite color combinations? Do you have special tips for color selection? Let us know in the comments.