Pages

Showing posts with label stitch. Show all posts

Friday, July 22, 2016

Mermaid Crochet Stitch

Over time, I've had many inquiries about the stitch that I used in my Mermaid Cowl. I had been hesitant to share information about the stitch separate from the pattern because I didn't want to dilute its value. However, that's not really in the spirit of the crochet community. After all, I use stitch dictionaries to help me design patterns. Thus, I have decided to share my mermaid stitch pattern with you. Although, the extended information (specific stitch counts, step by step tutorial, etc) will remain with the pattern.

Crocodile or shell stitches are sometimes erroneously called mermaid stitch, but as far as I can tell there isn't a unique crochet stitch called mermaid stitch. Now there is! I hope you enjoy my mermaid stitch.


Start by chaining a multiple of two. 

Row 1: Starting in second ch from the hook, work 1 sc into each ch across.

Row 2: Ch 1, turn. Work 1 sc into first st. *Work [dc, ch 3, dc] into the following stitch, work 1 sc into next*, rep from * to end of row.

Row 3: Ch 1, turn. *Work 1 sc into first st, ch 1 behind scale*, rep from * across, ending with 1 sc in final st.

Row 4: Ch 1, turn. Work 1 sc into first st. *Work 1 sc in ch 1 space, work [dc, ch 3, dc] in sc*, rep from * across ending with 1 sc in the final ch 1 space and 1 more sc in last st. 
 
Row 5: Ch 1, turn. Work 1 sc into first st. *Work 1 sc into next st, ch 1 behind scale*, rep from * across ending with 1 sc in each of the last 2 sts.

Row 6: Ch 1, turn. Work 1 sc into first st. *Work [dc, ch 3, dc] into next sc, work 1 sc into the following ch 1 space*, rep from * to end of row.

Row 7: Ch 1, turn. *Work 1 sc into first st, ch 1 behind scale*, rep from * across ending with 1 sc in final st.

Row 8: Ch 1, turn. Work 1 sc into first st. *Work 1 sc in ch 1 space, work [dc, ch 3, dc] in sc*, rep from * across ending with 1 sc in the final ch 1 space and 1 more sc in last st. 

Row 9: Ch 1, turn. Work 1 sc into first st. *Work 1 sc into next st, ch 1 behind scale*, rep from * across ending with 1 sc in each of the last 2 sts. 

Rows 10 through ?: Rep Rows 6 through 9 as many times as desired.

Fasten off and weave in ends.


Monday, March 2, 2015

Learn to Crochet Lesson Three: How to Single Crochet

Today I am continuing on with my series for beginning crocheters. So far we've learned how to tie a slip knot and how to work a base chain. It's time to tackle our first major crochet stitch, single crochet. The most basic of all crochet stitches are single crochet, half double crochet, double crochet, and triple crochet. Single crochet is the shortest of these. It is roughly as wide as it is tall. The boxy nature of single crochet makes it great for detailed colorwork. Single crochet is also dense, making it good for items that need stiffness and structure like purses, toys, and household items.

Don't worry too much about making a particular item while you learn. Later there will be a CAL (that means crochet-a-long) that will help you to reinforce the skills you're learning as you create a finished project. For now, just practice a bit and get acquainted with your yarn and hook as you work. Here we go!

Start by chaining any number of stitches between about 10 and 15. I chained 11. 

You will now be working from right to left on your chain stitches. Skip the first chain stitch. Remember how I said that single crochet is about as tall as it is wide? That skipped chain stitch will be your first turning chain. A turning chain moves you up vertically for each new row and ensures that your work has even edges. This means that if I chain 11 for my base chain and I'm working single crochet, I will actually end up with 10 stitches in each row. That last chain stitch became by turning chain.

Now, insert your hook into the back loop of the second chain stitch from the hook. See the purple "v's" in the picture above? Each stitch has a front and back loop. You can insert your hook under either or both of these loops on your base chain depending on what your project calls for. Today, simply insert your hook into the back loop.

Here is another view of my hook under the back loop. Now it's time to yarn over as we did when chaining. See my yarn over under my hook tip?

Time to pull the yarn over through that back loop. Depending on how you hold your hook you may twist it in your fingers slightly as you work. It might be hard at first but you will soon develop a rhythm and pulling through will be no big deal. If you become tangled up or frustrated you can always pull out your stitches and start over when you're ready to try again.

Here I have pulled through. Now I have two loops on my hook. We are almost done with 1 single crochet stitch.

Yarn over once more just as you did before. 

Finally, pull through both of the loops on your hook. That's it! Your first single crochet stitch. There is one loop left on your hook. This is your working loop that will remain as you continue. 

Here's another view of your first stitch. Notice the "v"? You will work into those loops again when you're crocheting your second row. You're ready for the next stitch!

Here I am inserting my hook into the back loop of the next chain stitch.

By following the same steps as above (insert hook, yarn over, pull through one, yarn over, pull through two), you will soon have your second single crochet stitch completed.

Here is that top view once more. See the two stitches?

Continue on in the manner until you have worked into the back loop of every chain stitch. You should now have ten single crochet stitches (or one less than your base chain). 

Let's recall what I said about turning chains. They give us the height we need for the next row. Since we are ready to start row two of single crochet, we need a turning chain of 1. Yarn over.

Pull through. You've made a sole chain stitch and your turning chain is complete. Now it's time to turn. Turning allows us to work into the stitches of the previous row from right to left.

Turning basically means flipping your item. Hold one end in each hand and rotate it horizontally 180 degrees until it looks like the picture above. 

Hey, look! There's a whole row of "v's" just waiting to be crocheted into. From now on, insert your hook under both loops of each stitch as shown in the picture above. No need to skip the first stitch, either. We already have our turning chain for height. Your first and second rows should have the same number of stitches.

Here I have worked one single crochet into the first stitch of row two.

Here is what my second row looks like when it's complete. I'm ready to work up row three! I simply need to chain 1 for my turning chain and then turn my work as before.

Here's a swatch, or small sample, of single crochet. My swatch has 12 rows. It's okay if your stitches are uneven at first. Practice makes perfect! Just keep going until you feel comfortable with single crochet.

We've covered a lot in this lesson. If you have any questions about crochet and the process I've outlined, please don't be afraid to ask them in the comments! I'd love to hear from you. Next up will be half double crochet.

Wednesday, November 27, 2013

Criss Cross Stitch

Tomorrow is Thanksgiving! I'm really excited and certainly very thankful. My favorite dish at Thanksgiving is the green bean casserole. What's yours? To start preparing, today I am making the dessert ahead of time. It's not pumpkin pie, but a pumpkin roll. I like pumpkin rolls because they are a delicious twist (ba dum ch) on the traditional. Sometimes it's nice to mix things up a bit.

For a different take on a common stitch, why not try the criss cross double crochet stitch? This technique is sometimes called cross-over double crochet and it is exactly what it says on the tin. It is worked in sets of two stitches, with the first double crochet worked in the second stitch before you backtrack and work the second double crochet into the first stitch from behind. Here is an excellent tutorial. I would definitely suggest this stitch to a beginner because they will utilize skills they likely already have with a little twist to make it interesting. Also, the motions performed will help to prepare you for around the post crochet if you haven't tried it yet. I'm in a perpetual state of stash busting. This criss cross project was great because I made it for a tall girl and it used up a lot of yarn!


To finish I added a simple picot border. Fringe might have looked nice but the scarf was already so long that I didn't think it would be a good idea. This stitch has a nice rhythm and a modern look to it.

Wednesday, October 9, 2013

Boxed Shell Scarf

I've been doing a lot of pattern designing and present making these past couple of weeks. Obviously I could crochet all day every day, and often do, but sometimes I need a little change from the pattern I'm working on so that I can keep up my enthusiasm. I decided to take a quick break from my current large project to work with some delightful yarn that's been calling my name. Remember that Crystal Palace Chunky Mochi in Blueberry Pancake? Here's what I did with it.


I used an 8mm hook to make a scarf. I didn't have much of the yarn, only about 150 yards, so I also chose an open stitch pattern, the boxed shell stitch. The two row repeat is simple yet attractive. I used a stitch dictionary to create my scarf, but there is a good tutorial available on YouTube.


It was fun to make something for myself for a change. My new scarf is so plush and yummy. As all of you crocheters out there prepare for the holiday season, I hope you take some time to make presents for yourselves as well.


Wednesday, July 17, 2013

Wheel of Dreams Baby Blanket

I have an event coming up at the end of next week (which I will tell you all about after it happens!) that I am working hard to prepare for. Part of my preparations include me attempting to finish three of the patterns I've been thinking about and working on. This means not only creating the item itself, but also taking the time to capture in-progress pictures and writing instructions for the pattern PDF. I have been crocheting so much that I'll probably get tendonitis if I'm not careful, but the show must go on! Today I finished the first of the three patterns on my list. Here is my Wheel of Dreams baby blanket.


As you can see, the pattern heavily relies on Catherine's wheels, which are super fun to make. I'm happy with the way the blanket turned out. I hope to use the applique pattern I wrote in later projects as well. What other color combinations would look nice? I chose the two blues so that the blanket would look like the sky. The pattern is available in my Ravelry store

Ranna would like you to know that she was very helpful to me while I wrote this pattern. Indeed, she often acts like a second shadow to me and "helps" me with all of my daily activities. 


I'd like to pretend that I'll take a break for a day, but I know I won't. There are too many awesome things in my head that I need to bring to life with my hooks! Stay tuned for more original patterns and a recap of my upcoming event. Ta ta for now!

Monday, July 15, 2013

Special Edition: Basketweave Tutorial

So here's the deal. I had a few comments requesting a tutorial for the basketweave stitch. This has inspired Illuminate Crochet's first Special Edition post. That's right folks, today you get two posts instead of one! I may do this from time to time as I see fit. The following is an explanation of the basketweave stitch for all interested parties. To be successful you will need to be confident in your ability to chain and double crochet. You may also wish to have a notepad and pen to tally your rows as you complete them. Any size hook and yarn is fine, but I recommend 5.5 mm or 6 mm in a light color when you are learning something new. Each picture will be followed by text instructions. Ready? Here we go!

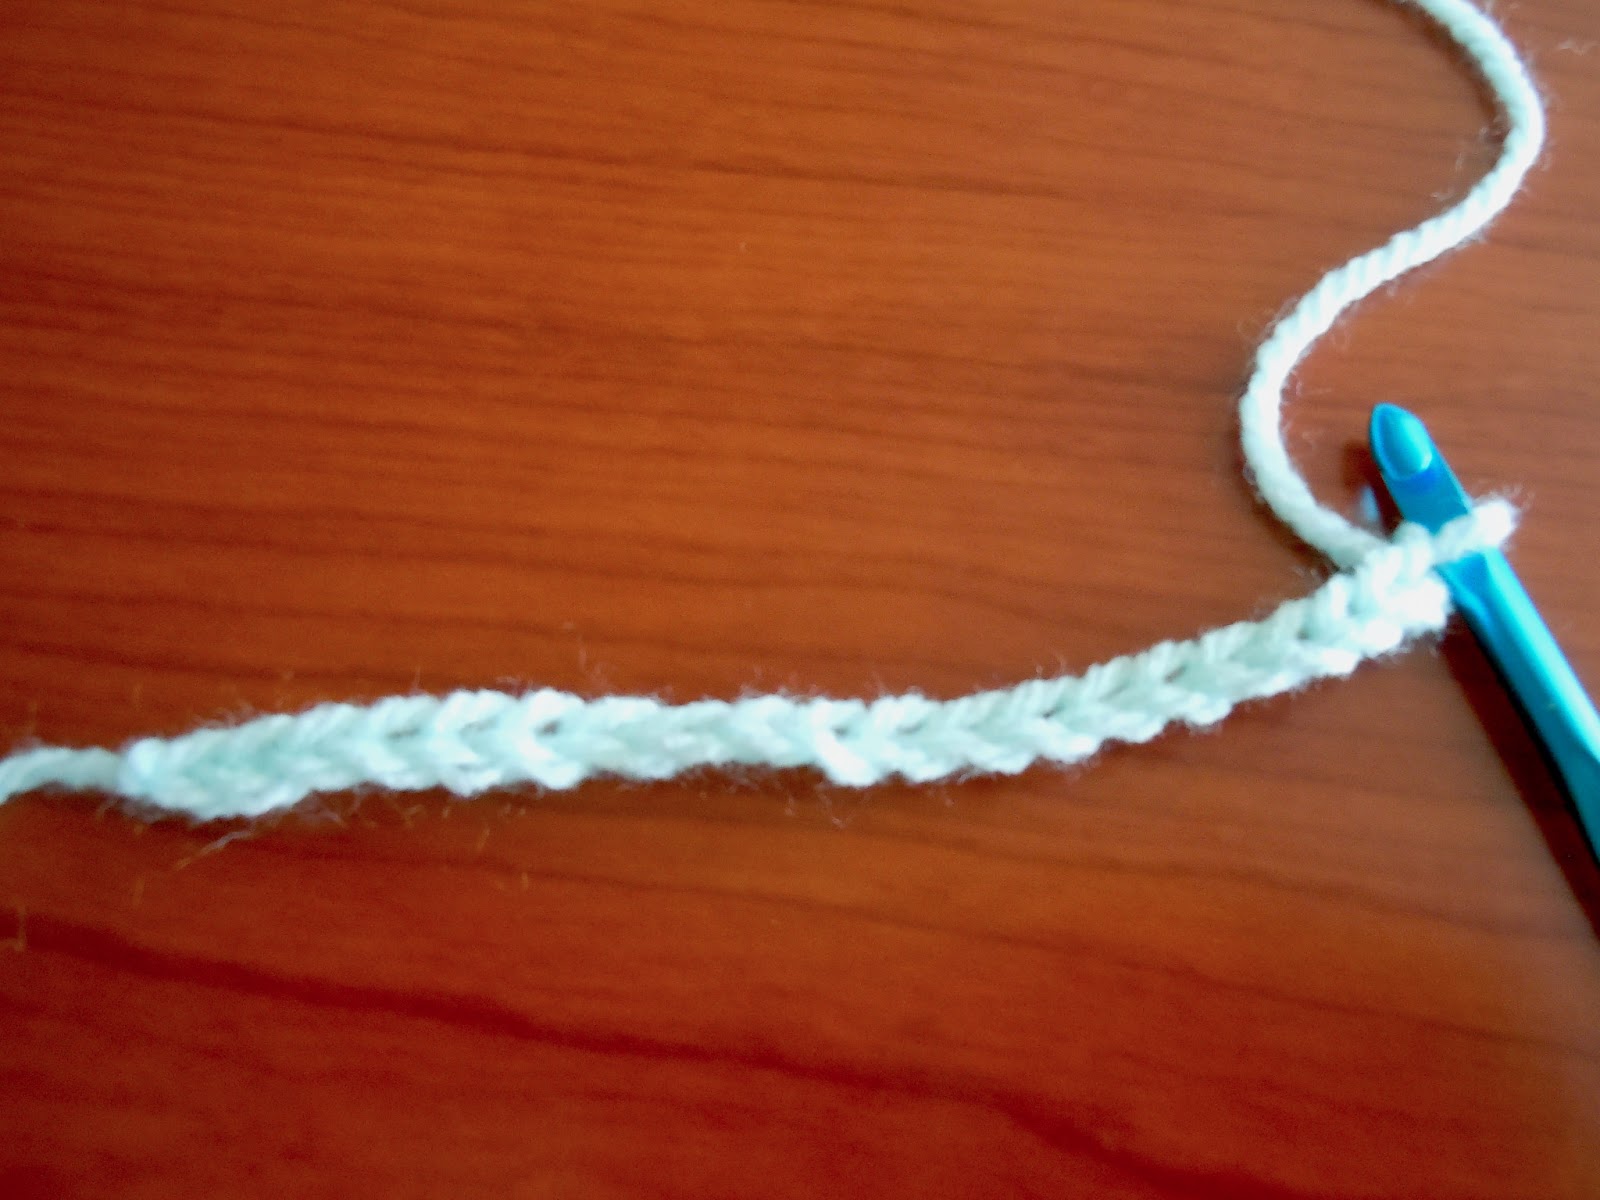
Start by chaining a multiple of 4. I chained 16 for my swatch, but I would chain 20 or 24 for a scarf width depending on the yarn and hook size. Add 4 more chain stitches. Since I started with 16, this brings my total to 20.

 We are now ready to begin the first row. The entire pattern will be worked as double crochet. Skip the first 3 chain stitches, yarn over, and insert your hook into the fourth chain stitch.

 Work 1 double crochet stitch into each chain stitch across. I have 18 posts including the turning chain made by skipping those first three stitches.

 Chain 2 and turn. We will now begin our second row by working around the posts. We will not be working into the "v's" like we would if we were doing another row of double crochet. We will be working around the posts made by the stitches of the previous row.

Skip the first post. Yarn over and insert your hook from right to left under the following double crochet stitch. In this picture you can see the post resting over the front of my hook, followed by my yarn over, followed by my working loop (the loop that always stays on your hook as you work).

 Yarn over and draw up a loop just like you would with any other double crochet stitch. 

 Finish your double crochet stitch as you normally would (yarn over, pull through two, yarn over, pull through two again). Congratulations! You have made a front post double crochet stitch. Notice that the stitch is now raised in the front.
Work three more stitches in just the same way, inserting your hook under the posts. 

We will now start a new set of four, this time back post double crochet. Yarn over and insert your hook from right to left under the next post from the back of the work. The post will rest on the back of your hook. Here you see a view from the top.

Here is a view from the front. Notice my hook is behind the work and the post of the current stitch is resting on the back of my hook. 

Yarn over and draw up a loop.

You now have three loops on your hook. Finish the stitch just like a regular double crochet to complete your back post double crochet stitch.

Here I have completed 4 back post double crochet stitches, inserting my hook from behind each time, pulling the posts back. Notice the difference between the four front post stitches and the four back post stitches.

Here is a view from the top.

Remember those front post double crochet stitches? Work another set of four. Continue working alternating sets of four until you reach the end of the row. I worked 4 front post dcs, 4 back post dcs, 4 front post dcs, and 4 back post dcs.

To finish the row, work 1 double crochet stitch into the top of the turning chain from the previous row. Chain 2 and turn.

For row three simply repeat row two. In other words, when you come to a front post like the one above, work a front post double crochet stitch. When you come to a back post, work a back post double crochet stitch. 

Here is my first completed front post stitch of my third row.

Remember to insert from the back when working a back post double crochet.

Yarn over.

Draw up a loop.

Finish the stitch as you would a normal double crochet stitch. 

Finish the row by working a double crochet stitch into the top of the turning chain as before.

Whew! We are done with row three, our second row of around the post crochet. Remember, our first row was regular double crochet.

Work two more rows as we did before. Here is my swatch at the end of my fifth row. I worked 1 row of regular double crochet and then 4 rows of around the post crochet.

Four our next row (row 6) we will start by chaining 2 as before. 

Don't panic. We are going to reverse the position of our posts. Instead of starting with a front post double crochet, we will start with a back post double crochet. Here I have yarned over and inserted my hook from the back, pulling the first post back as well. 

This is what it looks like from the front. Complete the stitch as you would a normal double crochet.

Here is a view from the back after I completed the stitch. Repeat this process for the following 3 front posts, converting them into back posts.

When you reach a back post, work a front post double crochet stitch, inserting your hook from the front. Here I have drawn up a loop before finishing the stitch.

This is what your work should look like at the end of row 6. The front posts are now back posts and vice versa. It may feel funny to work these stitch changes but I know you can do it! If you make a mistake simply pull it out and try again.

Don't forget to work 1 double crochet into the top of the turning chain at the end of every row. In this picture you can see the turning chain just hanging out and waiting to be crocheted into.

For rows 7, 8, and 9, go with the flow. When you reach a front post work a front post, when you reach a back post work a back post. Here I am at the end of row 9 after completing two sets of 4 rows each. To continue your object, continue working 4 rows alike and switching the posts on every 5th row. These sets of four identical rows are what form your basketweave. 

If you have any questions, feel free to ask them in the comments! If you need a good video, I suggest All Free Crochet's YouTube series with Mikey. Happy hooking!