Even though there are so many clever crochet patterns available it can sometimes be hard to find a single pattern that is exactly what you're looking for. If a few of them come close enough, why not combine them to form a totally unique object? That's just what Sherie did when she made her Baseball Blanket, today's Remix Friday project. Here's her story.
The Crocheter
My name is Sherie. I learned to crochet as a girl but never really
started crocheting until I retired in 2012.
The Original Pattern
Corner-to-Corner Throw by Catherine J. Watson and Bouncy Ball Baby Blanket by Debbie Smith
The Story
I have two grandchildren and
made the baseball blanket for my grandson.
The Remix
I used the Bouncy Ball pattern on Ravelry to make the squares. I
initially was going to make just the squares to fit a twin bed, but my
husband thought I should make a diamond shape. So I joined the
completed squares into a diamond and for the corners, used the corner to
corner pattern on Ravelry to simulate grass. I joined with the ladder
stitch. Since my son-in-law is a Braves fan, I decided to make the
baseball squares in blue. The result was a blanket that will fit on a
queen size bed!
Crochet is... so very addicting!
What a cool gift! Thank you so much for sharing your project with us today, Sherie.
Friday, August 15, 2014
Wednesday, August 13, 2014
How to Do Foundation Single Crochet: Two Ways
You know what I just love about crochet? There are so many different ways to do things. Because we're only working with one hook and only one stitch is active at a time (with the exception of Tunisian), we have a lot of options for places to insert our hook. That's why crochet is ideal for shapework like amigurumi. So versatile!
Foundation single crochet is an invaluable skill that saves time and eliminates crocheting into the chain. Seriously, who likes crocheting into a wiggly base chain? Not me. You can generally substitute in foundation single crochet whenever a pattern asks you to work up a base chain while working in rows. If Row 1 of your pattern happens to be a row of single crochet, you can also count your foundation single crochet chain as your first row! Sweet.
I also know that those many options I mentioned can sometimes be confusing. Inserting the hook in a place you didn't intend to can give your item a different look than you wanted. If you've been stumped by foundation single crochet and you'd like to sort it out, today I'm here to help! I'll show you not one but two ways to do foundation single crochet. You should be familiar with chain stitches and single crochet stitches before attempting foundation single crochet. It's all about where you insert your hook! Grab a nice light colored yarn and your favorite hook and come see what all of the fuss is about.
Foundation single crochet is an invaluable skill that saves time and eliminates crocheting into the chain. Seriously, who likes crocheting into a wiggly base chain? Not me. You can generally substitute in foundation single crochet whenever a pattern asks you to work up a base chain while working in rows. If Row 1 of your pattern happens to be a row of single crochet, you can also count your foundation single crochet chain as your first row! Sweet.
I also know that those many options I mentioned can sometimes be confusing. Inserting the hook in a place you didn't intend to can give your item a different look than you wanted. If you've been stumped by foundation single crochet and you'd like to sort it out, today I'm here to help! I'll show you not one but two ways to do foundation single crochet. You should be familiar with chain stitches and single crochet stitches before attempting foundation single crochet. It's all about where you insert your hook! Grab a nice light colored yarn and your favorite hook and come see what all of the fuss is about.
Here's the first method. Start with your slip knot as you always do when starting a base chain.
Work 2 chain stitches. Now, instead of continuing on we are going to stick our hook under the back loop of the first chain stitch as shown by the arrow.
There we go!
Now yarn over and draw up a loop.
Yarn over again. This should all be familiar so far, just like a regular single crochet stitch.
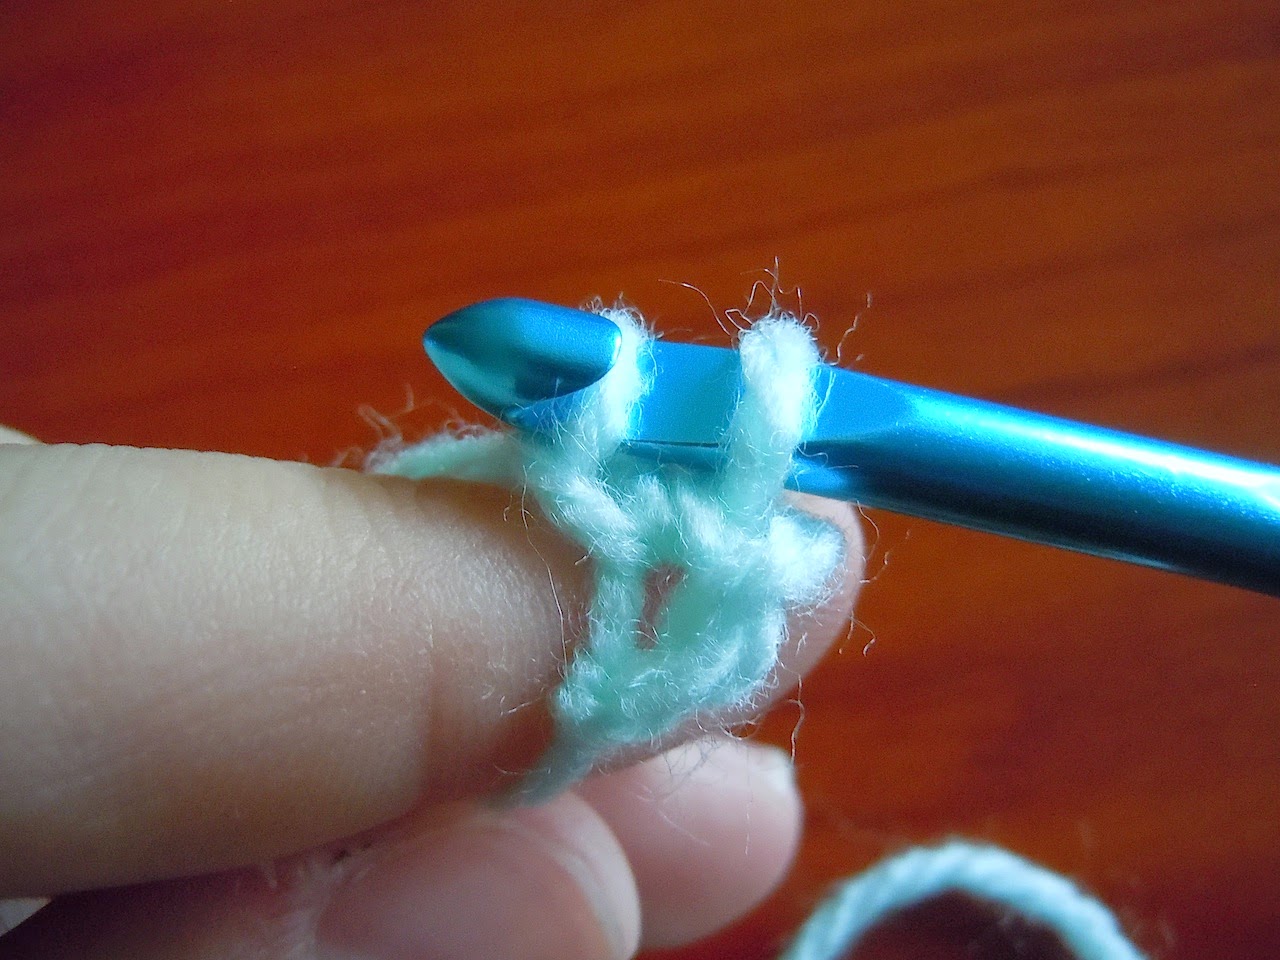
Here's where things are a bit different. Instead of pulling through both loops as you normally would, only pull through ONE loop as shown above. You'll be left with two loops on your hook again. This step is the "chain" part of the fsc (that's short for foundation single crochet).
Yarn over once more.
This time pull through both of the loops on the hook. Fabulous! That was the "stitch" part of our fsc. Congrats, you have now made your first fsc stitch.
Here's another view of our stitch. The lines show the two arms of the "v". It looks like the top of any other single crochet stitch.
Let's continue with our fsc. Each time you make a new stitch you'll insert your hook only into the loop shown by the arrow above.
Like so.
As before, draw up a loop. Yarn over and pull through one, yarn over again and pull through two. Review the photos above again if you need another look.
Now you've got a second fsc stitch.
Here are our stitches from the top.
Continue on until your chain is the desired length.
Notice how tidy the stitches are. Working into them on row one will be a breeze.
This first fsc method leaves a bottom edge that has noticeable gaps. These gaps could be useful for attaching fringe or tassels, working a border, etc.
Now we'll take a look at another way to do fsc. The finished chain looks a bit different.
Start by chaining 2 just as you did for the first method.
Now, instead of inserting the hook through only the back loop of the first chain stitch you will also insert it into the butt/spine of that stitch as shown by the line above.
Just like this. Now simply finish the stitch just like we did in the first method. Pull up a loop, yarn over, pull through one, yarn over again, pull through two.
There's our first stitch.
As you work your method 2 chain, continue inserting your hook under the back loop and the butt/spine loop every time you make a new fsc stitch.
Here is what a method 2 chain looks like. It's much denser.
Here my fingertip is pointing at the top row of "v's", the stitches you'll work into on row one. There's another little row of v's to the left of my finger that weren't there for method 1. You could potentially work into those loops if you wanted another piece of crochet fabric to be attached at an angle.
That's not all! This second method also leaves a line of v's on the bottom edge of the chain. This second method is handy for garment making when you don't want any holes in your seams.
Play around with both of these methods to see what works for you. There's no right or wrong choice! I like the first method because it works up a bit quicker, but I will concede that the second method has a fuller, tighter look. Have any questions about fsc? Feel free to ask away in the comments.
Monday, August 11, 2014
Crochet Podcasts
I love crochet podcasts. I like to listen to something or watch something while I'm designing. Sometimes the section I'm designing requires too much of my attention for me to have a movie on in the background and crochet podcasts are just the thing I need to keep me on track. I'm really grateful to the folks who make podcasts because they take a lot of time and effort to put together. Here are my four favorites.
Crochet Chat was a podcast by designer Stacey Trock that ran for 20 episodes from 2012 to 2013. Stacey is so cheerful that listening to her podcast will cheer you up, too. She is gradually re-releasing podcast episodes, so if you're new to Crochet Chat and start listening now it will be as if it's still being released :) Are you sad there's no new Crochet Chat episodes? Never fear! Just check out Coffee with Stacey, Trock's new video series. It feels a lot like a podcast and doesn't demand too much visual attention. It's really fun to pretend you're having a coffee date with her while she catches you up on everything new in her crochet world.
Yarncraft was a crochet and knitting podcast that ran for several years, so there are tons of back episodes to listen to. The podcast is hosted by Lion Brand Yarn. It's classy and relaxing. The personalities of the fiber-loving hosts are great and create wonderful on-air chemistry. The podcast covers a wide range of topics that are relevant to a crocheter's life. Plus, who doesn't love Lion Brand?
This interview-style podcast is run by designer Marly Bird and features both crochet and knitting. Marly interviews many of the top names in fiber arts. Her guests share valuable information on design, fiber arts, the fiber community, and more.
Getting Loopy! was another awesome podcast that is now archived. I love host and designer Mary Beth Temple's jokes and candor. She has a lot of great interviews with fiber folks as well.
Do you have a favorite podcast that wasn't mentioned? Let us know in the comments! Have a great time listening to all of these talented crocheters.
Friday, August 8, 2014
Remix Friday: Freeform Pillow
Hello, lovely readers! It's Friday once again and I'm so excited to show you this week's Remix Friday project. This remix was made by Akua Lezli Hope, a respected crochet designer and accomplished artist. Wait, you may say, I thought this was Remix Friday not Friday Focus! We're learning about a designer? Yes! Indeed. This remix is super special. Akua has crocheted a captivating object that was remixed from pieces of her own patterns. She incorporated aspects of nine different designs to make one awesome pillow. Cool, right?! It's got such magnificent texture. Check it out.
The Crocheter
I’m a creator who uses mainly fiber and words with a deep affection for glass, fire, and metal. I’m an award winning poet, a crochet designer, a handpapermaker, and the founder of a new paratransit nonprofit. When I was able bodied I also created kilncast, sandcast and flameworked glassworks. I just fell in love with straw and stick weaving and today my first peg loom arrived...
The Original Pattern
Lezli Paisley, Cat Spiral, Pretty Picot Paisley, Frost Flower, Swirling Square Motif, SunRays Shrug and more by Akua Lezli Hope
The Story
Every year Ravelry has a party for National Crochet Month and a group forms that sponsors a freeform crochet along where daily there is a new stitch or technique to try. This year I committed to finishing and making something for my home. Most of what I make is for others and my environment should share in the love. Why was my lovely yellow leather couch so bare? Well, no longer.
The Remix
Between the patterned motifs are total improvisation as well as an echoing effect that I call encasing, inspired by Ukrainian designer Lena Green. The motif is filled in and surrounded, making it easier to connect to other components and motifs. I like the echo encasing where the shape of the motif is replicated through ridged echoes.
Crochet is... creates profound joy
So sunny, so awesome! What a statement piece. Ready to learn more about Akua? Visit her on her blog, Etsy, and her website.
The Crocheter
I’m a creator who uses mainly fiber and words with a deep affection for glass, fire, and metal. I’m an award winning poet, a crochet designer, a handpapermaker, and the founder of a new paratransit nonprofit. When I was able bodied I also created kilncast, sandcast and flameworked glassworks. I just fell in love with straw and stick weaving and today my first peg loom arrived...
The Original Pattern
Lezli Paisley, Cat Spiral, Pretty Picot Paisley, Frost Flower, Swirling Square Motif, SunRays Shrug and more by Akua Lezli Hope
The Story
Every year Ravelry has a party for National Crochet Month and a group forms that sponsors a freeform crochet along where daily there is a new stitch or technique to try. This year I committed to finishing and making something for my home. Most of what I make is for others and my environment should share in the love. Why was my lovely yellow leather couch so bare? Well, no longer.
The Remix
Between the patterned motifs are total improvisation as well as an echoing effect that I call encasing, inspired by Ukrainian designer Lena Green. The motif is filled in and surrounded, making it easier to connect to other components and motifs. I like the echo encasing where the shape of the motif is replicated through ridged echoes.
Crochet is... creates profound joy
So sunny, so awesome! What a statement piece. Ready to learn more about Akua? Visit her on her blog, Etsy, and her website.
Wednesday, August 6, 2014
Crochet Luxe Wristwarmer and Headband Set Pattern
I recently wrote a review of Zealana Luxuria Air Marle, a DK yarn, and in the process wrote a pattern. Since the yarn used is a luxury yarn, this prudent pattern uses only 1 ball or about 120 yards. The pattern includes both around the post stitches as well as front and back loop stitches, so you will want to follow those links and learn about them if you haven't already. Are you ready to make your own Luxe Set? Grab your 4mm hook and here we go!
Materials
- 120 yards of DK weight yarn (I used Zealana Luxuria Air Marle in color A899)
- US size G6 4mm crochet hook
- yarn needle
Terms
ch = chain, sl st = slip stitch, st = stitch, rep = repeat, dc = double crochet, fpdc = front post double crochet, bpdc = back post double crochet, FLdc = front loop double crochet, BLdc = back loop double crochet
Wristwarmer
For women's size small, chain 38. For medium, chain 40. For large, chain 42. Making sure there are no twists in the chain, sl st into the first ch to form a ring.
Round 1: Ch 3 (counts as 1 dc). Work 1 dc into each ch around. Sl st into the top of the ch 3 to join.
Round 2: Ch 3 (does not count as a st, now and throughout). Work 1 fpdc into the ch 3. Work 1 bpdc into the following st. *Work 1 fpdc in next st, work 1 bpdc in following st*, rep from * around. Sl st into the first st to join.
Round 3: Ch 3. Work 1 fpdc into each fpdc and 1 bpdc into each bpdc all of the way around. Sl st into the first st to join.
Rounds 4 and 5: Rep Round 3.
Round 6: Ch 3. Work 1 FLdc into same st as sl st. Work 1 BLdc into following st. *Work 1 FLdc into next st, work 1 BLdc into following st*, rep from * around. Sl st into the first st to join.
Round 7: Ch 3. Work 1 BLdc into same st as sl st. Work 1 FLdc into following st. *Work 1 BLdc into next st, work 1 FLdc into following st*, rep from * around. Sl st into the first st to join.
Rounds 8 and 9: Rep Rounds 6 and 7.
Round 9: Rep Round 6.
Fasten off and weave in ends. Make 2.
The headband pattern is coming up after these process pictures.
Headband
Chain 122. Making sure there are no twists in the chain, sl st in first ch to join.
Round 1: Ch 3 (counts as 1 dc). Work 1 dc into each ch around. Sl st into the top of the ch 3 to join.
Round 2: Ch 3 (does not count as a st, now and throughout). Work 1 fpdc into the ch 3. Work 1 bpdc into the following st. *Work 1 fpdc in next st, work 1 bpdc in following st*, rep from * around. Sl st into the first st to join.
Rounds 3 and 4: Rep Round 2.
Fasten off and weave in ends.
Now you have a soft, cozy little set that's all ready for autumn :)
Materials
- 120 yards of DK weight yarn (I used Zealana Luxuria Air Marle in color A899)
- US size G6 4mm crochet hook
- yarn needle
Terms
ch = chain, sl st = slip stitch, st = stitch, rep = repeat, dc = double crochet, fpdc = front post double crochet, bpdc = back post double crochet, FLdc = front loop double crochet, BLdc = back loop double crochet
Wristwarmer
For women's size small, chain 38. For medium, chain 40. For large, chain 42. Making sure there are no twists in the chain, sl st into the first ch to form a ring.
Round 1: Ch 3 (counts as 1 dc). Work 1 dc into each ch around. Sl st into the top of the ch 3 to join.
Round 2: Ch 3 (does not count as a st, now and throughout). Work 1 fpdc into the ch 3. Work 1 bpdc into the following st. *Work 1 fpdc in next st, work 1 bpdc in following st*, rep from * around. Sl st into the first st to join.
Round 3: Ch 3. Work 1 fpdc into each fpdc and 1 bpdc into each bpdc all of the way around. Sl st into the first st to join.
Rounds 4 and 5: Rep Round 3.
Round 6: Ch 3. Work 1 FLdc into same st as sl st. Work 1 BLdc into following st. *Work 1 FLdc into next st, work 1 BLdc into following st*, rep from * around. Sl st into the first st to join.
Round 7: Ch 3. Work 1 BLdc into same st as sl st. Work 1 FLdc into following st. *Work 1 BLdc into next st, work 1 FLdc into following st*, rep from * around. Sl st into the first st to join.
Rounds 8 and 9: Rep Rounds 6 and 7.
Round 9: Rep Round 6.
Fasten off and weave in ends. Make 2.
The headband pattern is coming up after these process pictures.
Headband
Chain 122. Making sure there are no twists in the chain, sl st in first ch to join.
Round 1: Ch 3 (counts as 1 dc). Work 1 dc into each ch around. Sl st into the top of the ch 3 to join.
Round 2: Ch 3 (does not count as a st, now and throughout). Work 1 fpdc into the ch 3. Work 1 bpdc into the following st. *Work 1 fpdc in next st, work 1 bpdc in following st*, rep from * around. Sl st into the first st to join.
Rounds 3 and 4: Rep Round 2.
Fasten off and weave in ends.
Now you have a soft, cozy little set that's all ready for autumn :)
Monday, August 4, 2014
Review: Zealana Luxuria Air Marle Yarn
Today I'll be reviewing Zealana Luxuria Air Marle Yarn. Disclaimer: I received this complimentary skein of yarn in exchange for a
review. I am not being paid to write this review and everything shared
here is my real opinion.
It's not everyday that one gets to play with a yarn that boasts a cashmere, silk, possum blend. I feel really special to be reviewing it! Also, I'd never tried possum before now so that was a treat.
This yarn is hand wash only due to the specialty fibers it's made of. The color I received is A899, which is a nice teal. The weight is DK and the skein is small at just over 120 yards. Since this yarn is from Zealana's Luxuria collection, it bears noting that this truly is a luxury yarn, priced at about $46 a skein. I know, that's quite a bit isn't it? I wondered how that price point could be justified given the yardage, so I began to play with the yarn.
The first thing I noticed was how solid the yarn felt as I worked with it. I've experimented with a few other luxury yarns, each of which felt a bit delicate in my hands and demanded special treatment. The label says "durable" and it really means it. When I changed my mind about a design choice and frogged a few rows the yarn pulled free very easily. It was comforting not to worry about harming the precious fiber. Despite this, the yarn is quite soft and has a lovely halo.
Here's my conclusion. Luxuria Air Marle isn't an everyday yarn, but then if it were it wouldn't be a luxury. It's lovely to work with and lovely to caress even though it does come in small amounts. I think the best use for this yarn is a small, special project. One could also give this yarn as a gift to a crocheter or knitter for a special occasion like Christmas or a birthday.
Are you ready to see my finished product? Here's what I decided to do with my single, precious skein.
It's a wrist warmer and headband set. If you've got a yarn this luxurious you want to feel it against your skin as much as possible, so I made sure to design something worn near one's hands. It's a decadent sort of project, therefore I've named it the Luxe Wrist Warmer and Headband Set. I have to mention one more thing about Air Marle... this yarn is warm! So very warm. Just the little bit around my wrists made my whole hand cozy. Even though it would cost a fortune, a sweater made out of this stuff would be most divine.
Interested in the pattern for the Luxe Set? Come back and visit this Wednesday when I'll be posting it here on the blog!
It's not everyday that one gets to play with a yarn that boasts a cashmere, silk, possum blend. I feel really special to be reviewing it! Also, I'd never tried possum before now so that was a treat.
This yarn is hand wash only due to the specialty fibers it's made of. The color I received is A899, which is a nice teal. The weight is DK and the skein is small at just over 120 yards. Since this yarn is from Zealana's Luxuria collection, it bears noting that this truly is a luxury yarn, priced at about $46 a skein. I know, that's quite a bit isn't it? I wondered how that price point could be justified given the yardage, so I began to play with the yarn.
The first thing I noticed was how solid the yarn felt as I worked with it. I've experimented with a few other luxury yarns, each of which felt a bit delicate in my hands and demanded special treatment. The label says "durable" and it really means it. When I changed my mind about a design choice and frogged a few rows the yarn pulled free very easily. It was comforting not to worry about harming the precious fiber. Despite this, the yarn is quite soft and has a lovely halo.
Here's my conclusion. Luxuria Air Marle isn't an everyday yarn, but then if it were it wouldn't be a luxury. It's lovely to work with and lovely to caress even though it does come in small amounts. I think the best use for this yarn is a small, special project. One could also give this yarn as a gift to a crocheter or knitter for a special occasion like Christmas or a birthday.
Are you ready to see my finished product? Here's what I decided to do with my single, precious skein.
It's a wrist warmer and headband set. If you've got a yarn this luxurious you want to feel it against your skin as much as possible, so I made sure to design something worn near one's hands. It's a decadent sort of project, therefore I've named it the Luxe Wrist Warmer and Headband Set. I have to mention one more thing about Air Marle... this yarn is warm! So very warm. Just the little bit around my wrists made my whole hand cozy. Even though it would cost a fortune, a sweater made out of this stuff would be most divine.
Interested in the pattern for the Luxe Set? Come back and visit this Wednesday when I'll be posting it here on the blog!
Friday, August 1, 2014
Remix Friday: Noro Hexagon Blanket
The right yarn can take a project from wow to WOW! Think about it: You're spending hours on your project, you're handling the yarn the whole time, and you want your finished project to be as great as it can be. Sometimes a yarn splurge is necessary ;) Today's remix is certainly WOW. The yarn selection and sheer size of the finished object takes it beyond the pattern. It's something else entirely. Let's hear what Candice has to say about her stunning creation.
The Crocheter
My name is Candice Miller, 32 years old from Virginia, and I’m a graphic/web designer by day. I taught myself to crochet in 2011 because I wanted to make a 1-Up Mushroom from Super Mario Bros., but I really started getting into it I think to mentally compensate for my impending thyroidectomy. I got my thyroid removed because I had Graves' disease. (Long story short, I no longer have a thyroid, but I still crochet a lot)
My project list and stash on Ravelry are massive. This might border on OCD, but they help me finish projects! I love Ravelry.
I have 2 pugs named Lilu and Sprocket, and my husband and I live in the “country" where the little girls have plenty of room to roam.
I recently taught myself to knit (gasp) because I wanted to make the Katniss Cowl from Catching Fire. Crochet is still my favorite, though. My other hobbies include jewelry-making, sewing, leather working, and I love comic books and movies. (If I think I can make something I see, I usually go for it until I get it right)
The Original Pattern
Hexagon How-To from Attic24
The Story
I made a king-sized hexagon blanket out of Noro Kureyon and Silk Garden. And although it fits the top of our bed, it’s going to live on the back of the couch in the living room so we actually see it. (As long as the pugs don’t mess with it, we’ll see)
I’d been inspired by this project and this project for the color changes.
And thought…what if I do something in between? And I have about 10 balls of Noro just hanging out in a box….and thus it started.
The Remix
The pattern itself is just for a hexagon, so you can do anything with it. I actually used the join-as-you-go method which supposedly makes for a stronger blanket and was also faster from what I’ve read. This method had its pro’s and con’s, for instance I was able to cluster like-colors together, but once I ran out of a color I’d have to wait until my order arrived before I could continue in that spot.
Join as you go method tutorial here.
I tried to control the color changes as best I could, it became more difficult toward the end, and I was splicing together different skeins of Noro to get the effect I wanted. (Noro just ties the yarn together sometimes! So I figured I could do the same)
Crochet is... challenging, rewarding, beautiful.
Beautiful! What a statement it must make when viewed in Candice's home. You can find more of her creative endeavors on Ravelry, Pinterest, Instagram, and her website. Have a colorful day!
The Crocheter
My name is Candice Miller, 32 years old from Virginia, and I’m a graphic/web designer by day. I taught myself to crochet in 2011 because I wanted to make a 1-Up Mushroom from Super Mario Bros., but I really started getting into it I think to mentally compensate for my impending thyroidectomy. I got my thyroid removed because I had Graves' disease. (Long story short, I no longer have a thyroid, but I still crochet a lot)
My project list and stash on Ravelry are massive. This might border on OCD, but they help me finish projects! I love Ravelry.
I have 2 pugs named Lilu and Sprocket, and my husband and I live in the “country" where the little girls have plenty of room to roam.
I recently taught myself to knit (gasp) because I wanted to make the Katniss Cowl from Catching Fire. Crochet is still my favorite, though. My other hobbies include jewelry-making, sewing, leather working, and I love comic books and movies. (If I think I can make something I see, I usually go for it until I get it right)
The Original Pattern
Hexagon How-To from Attic24
The Story
I made a king-sized hexagon blanket out of Noro Kureyon and Silk Garden. And although it fits the top of our bed, it’s going to live on the back of the couch in the living room so we actually see it. (As long as the pugs don’t mess with it, we’ll see)
I’d been inspired by this project and this project for the color changes.
And thought…what if I do something in between? And I have about 10 balls of Noro just hanging out in a box….and thus it started.
The Remix
The pattern itself is just for a hexagon, so you can do anything with it. I actually used the join-as-you-go method which supposedly makes for a stronger blanket and was also faster from what I’ve read. This method had its pro’s and con’s, for instance I was able to cluster like-colors together, but once I ran out of a color I’d have to wait until my order arrived before I could continue in that spot.
Join as you go method tutorial here.
I tried to control the color changes as best I could, it became more difficult toward the end, and I was splicing together different skeins of Noro to get the effect I wanted. (Noro just ties the yarn together sometimes! So I figured I could do the same)
Crochet is... challenging, rewarding, beautiful.
Beautiful! What a statement it must make when viewed in Candice's home. You can find more of her creative endeavors on Ravelry, Pinterest, Instagram, and her website. Have a colorful day!
Subscribe to:
Posts (Atom)